Your Guide to MightySolar
Congratulations! You have decided to explore how mighty powers could help you save time and effort in solar PV installations & team management. This page will support you on your very first steps within MightySolar – we hope it serves you well.
However, support@mightyfields.com is a place to look for more mighty support – don’t hesitate to use it!


Mighty Office
You might have different roles that support your field installations – managing the process, executing quality control of fieldwork execution and client communication. Project Managers, Fieldservice Managers, Work Planners, Client Service Managers, Account Managers etc., work in the office and highly depend on the information they get from the field about the installation services.
Let’s examine how MightySolar changes daily routines and saves time and effort for your office-based teams.
About & how to access
MightySolar Office is a web app to oversee and manage solar PV plant field installations. With MightySolar Office, the office-based staff manages the process and executes quality control of fieldwork execution and client communication.
You can access MightySolar Office with the user name and password at https://solar.mightyfields.com/.
You have received your username and password in your inbox from our mighty support team. In case you would forget the password, please follow the link Forgot password below the login area.
Projects overview
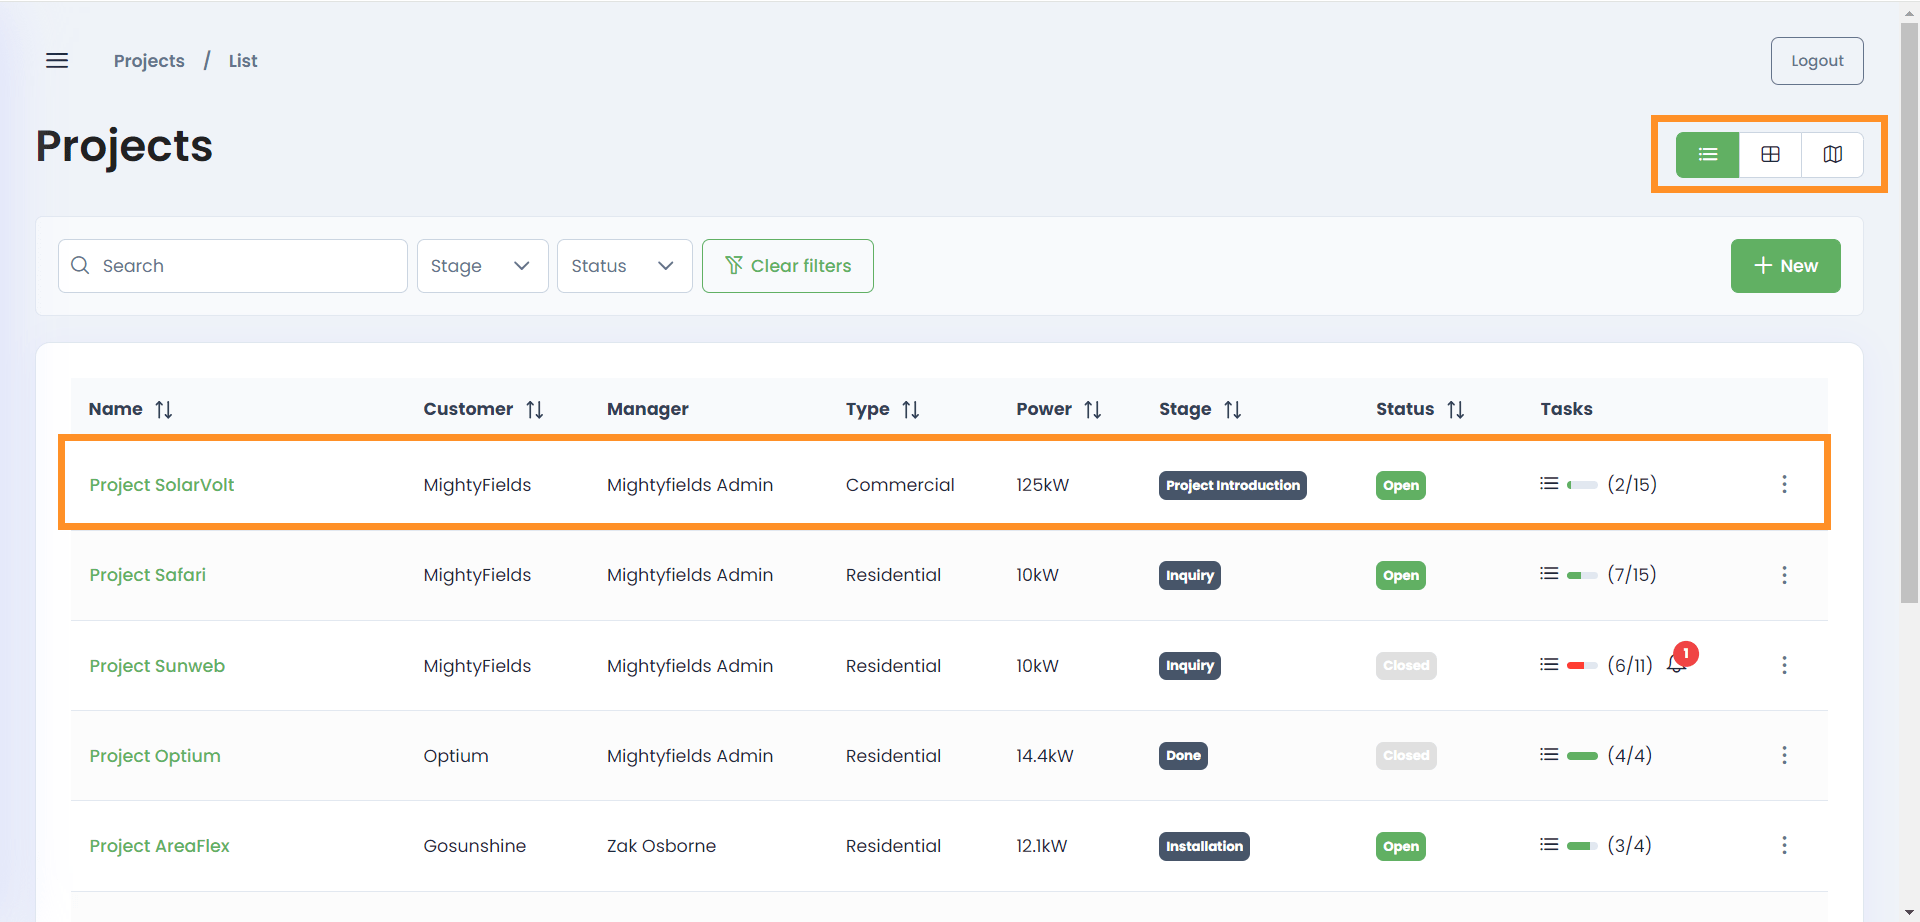
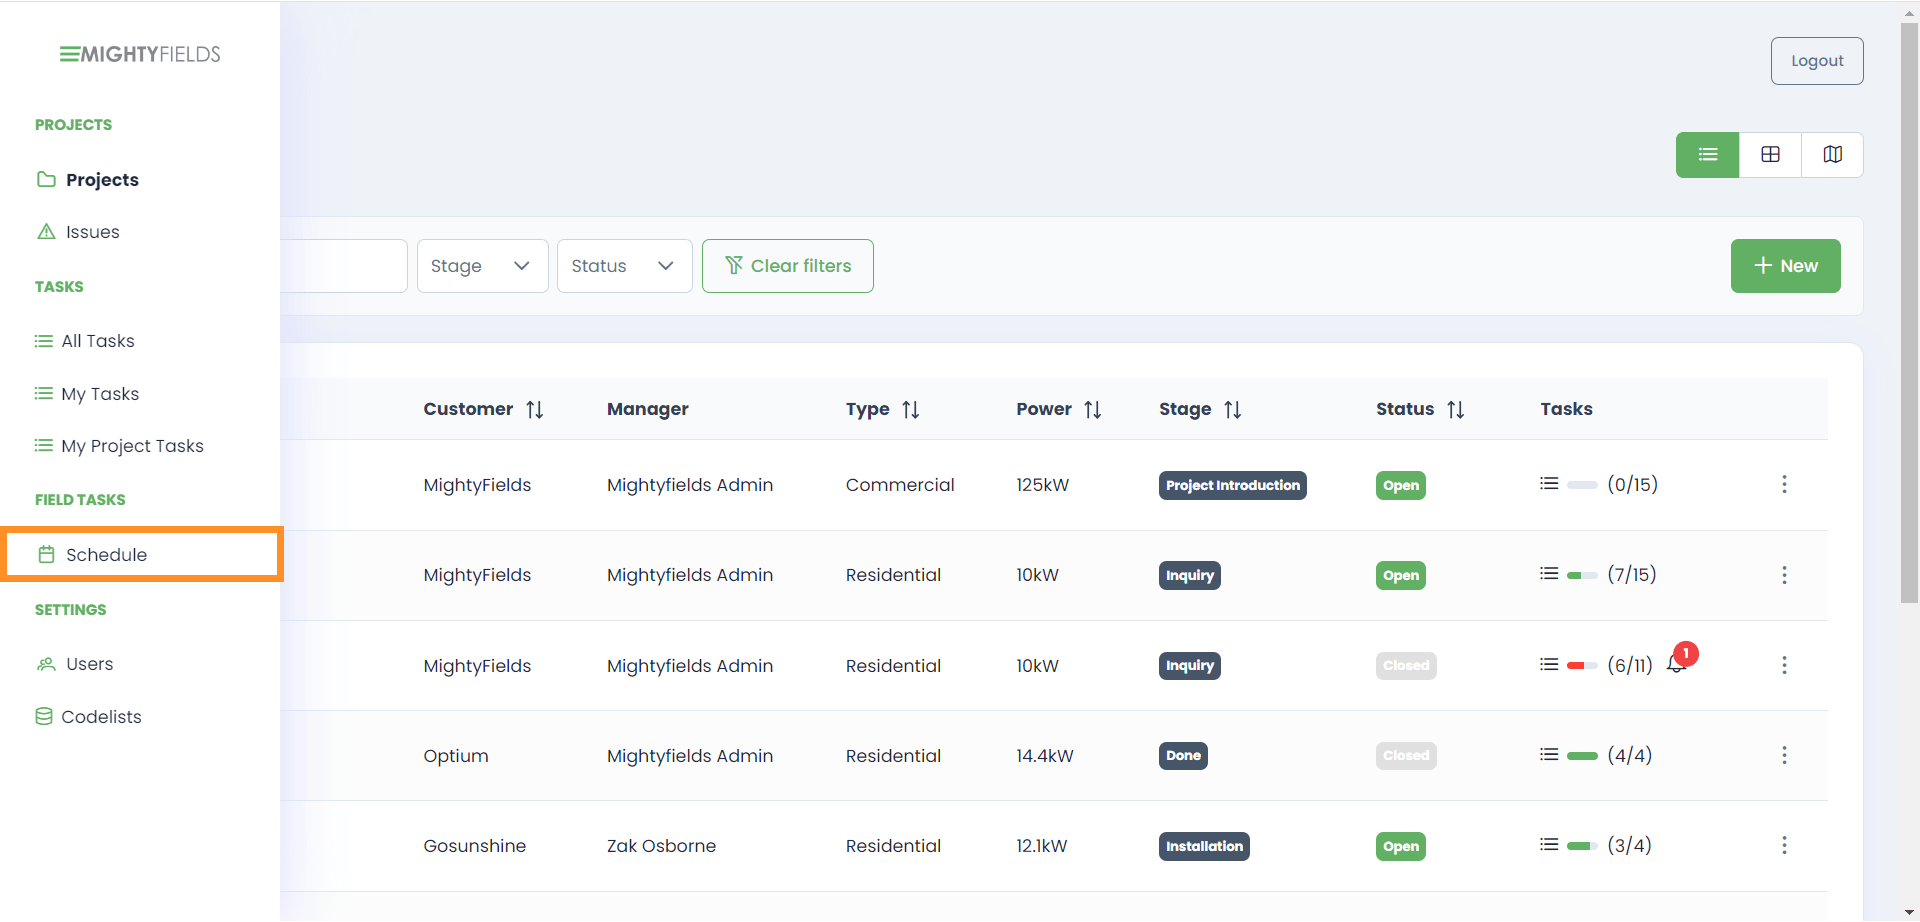
Once you log into MightySolar office, you will see the projects overview page. This centralized location for all your project documentation and information helps ensure clarity and organization.
Click on one of the three icons ![]() listed in the top right corner for different views. You can view your projects in list, kanban, or map view, each with unique benefits. Select the view you are most comfortable using.
listed in the top right corner for different views. You can view your projects in list, kanban, or map view, each with unique benefits. Select the view you are most comfortable using.
- List view lets you see all your projects in a single, organized list format.
- Kanban view provides a visual board with columns representing different stages of your projects.
- Map view visually represents your projects and their locations on a map.
Select any of the project’s “Project Name” to access more information about the project and all the reports performed in each installation stage. You may find more information about how the single project page works under the tab Single project page.
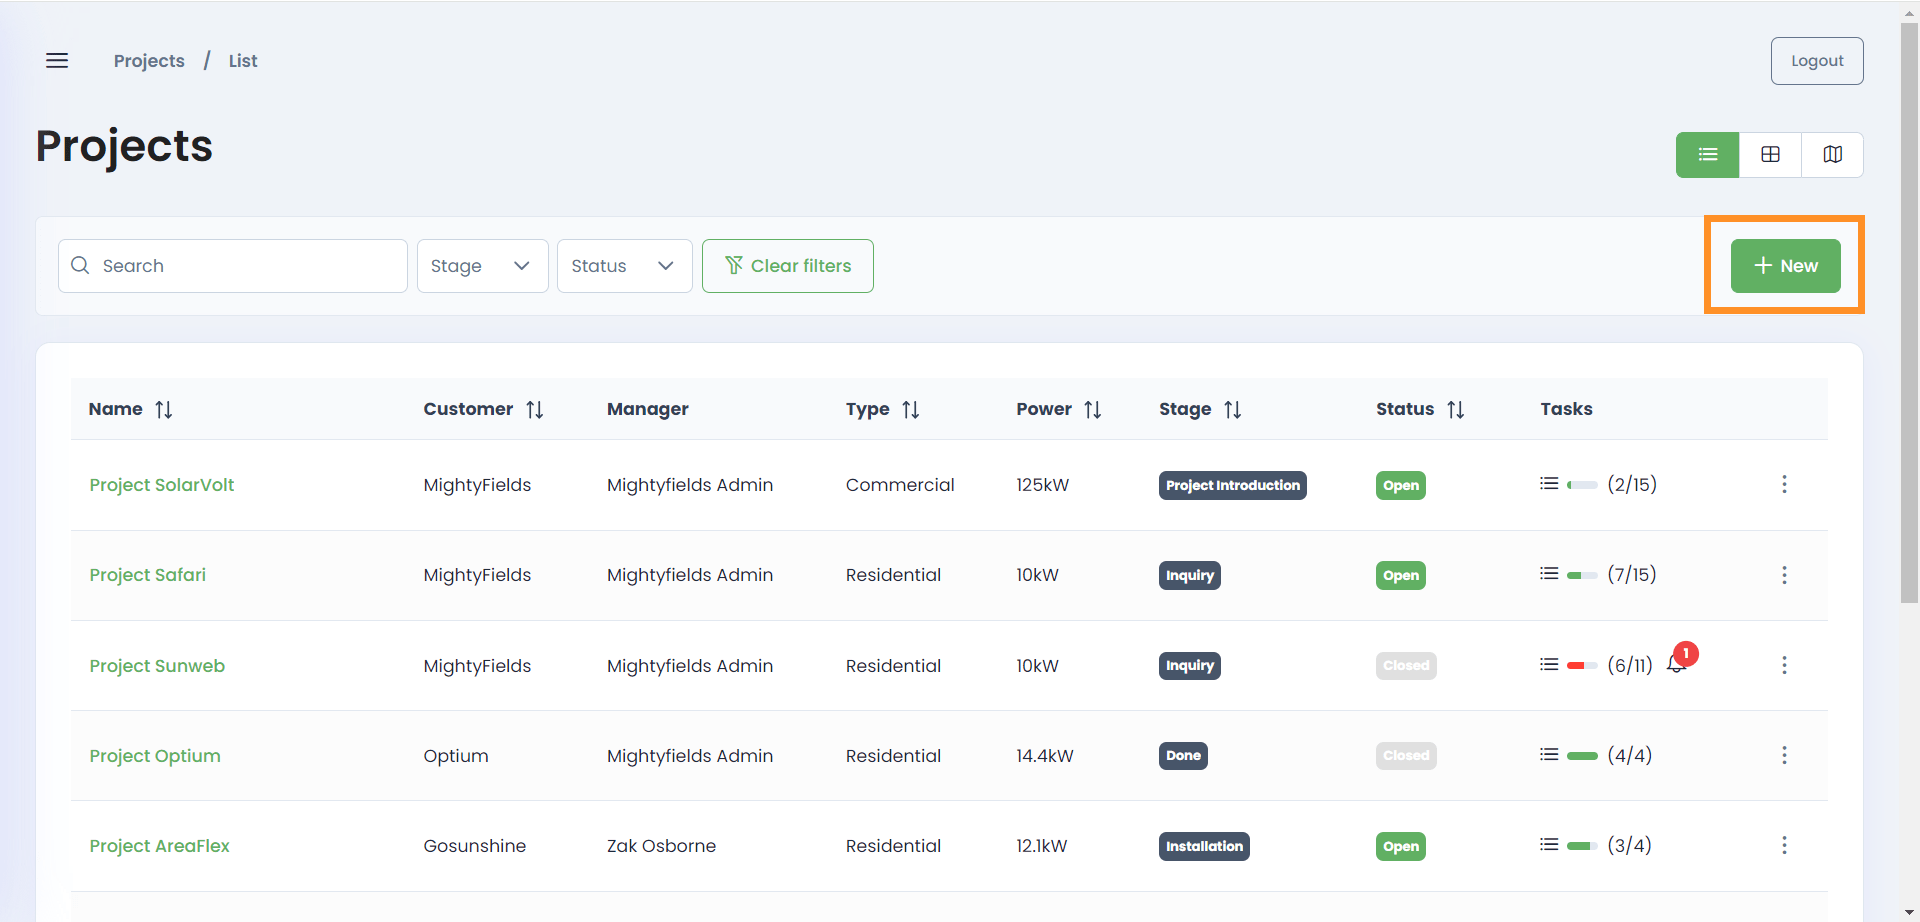
Create a new project
Click “New” ![]() to start a new project. It is located at the top right corner of the project overview screen.
to start a new project. It is located at the top right corner of the project overview screen.
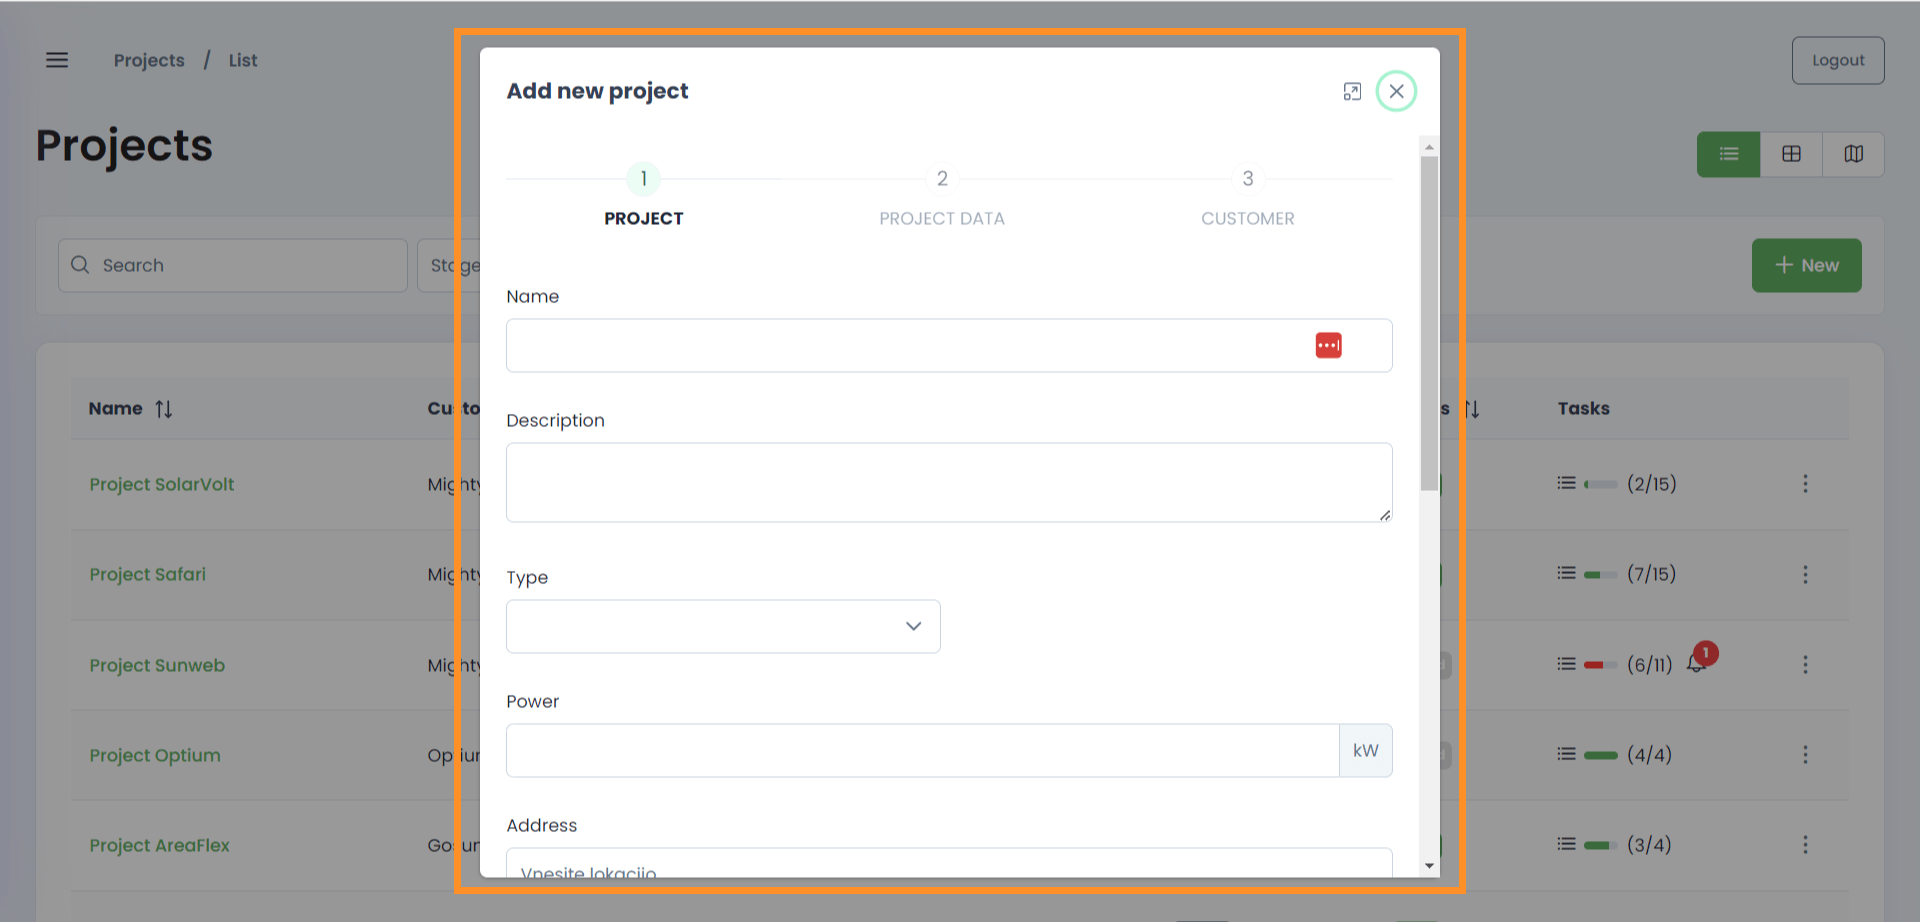
A new popup window will appear where you can fill in the core information about the project. This window will guide you through the steps for creating a new project.
You might also want to hear this
#1 If your process contains more obligatory information about the project, note that the system is adjustable to your needs.
#2 If you use any existing apps (ERP, DS, CRM) from which you would like to access the documentation from the installation sites, note that we can integrate the systems. Just let us know, and we’ll take care of the rest.
Single project page
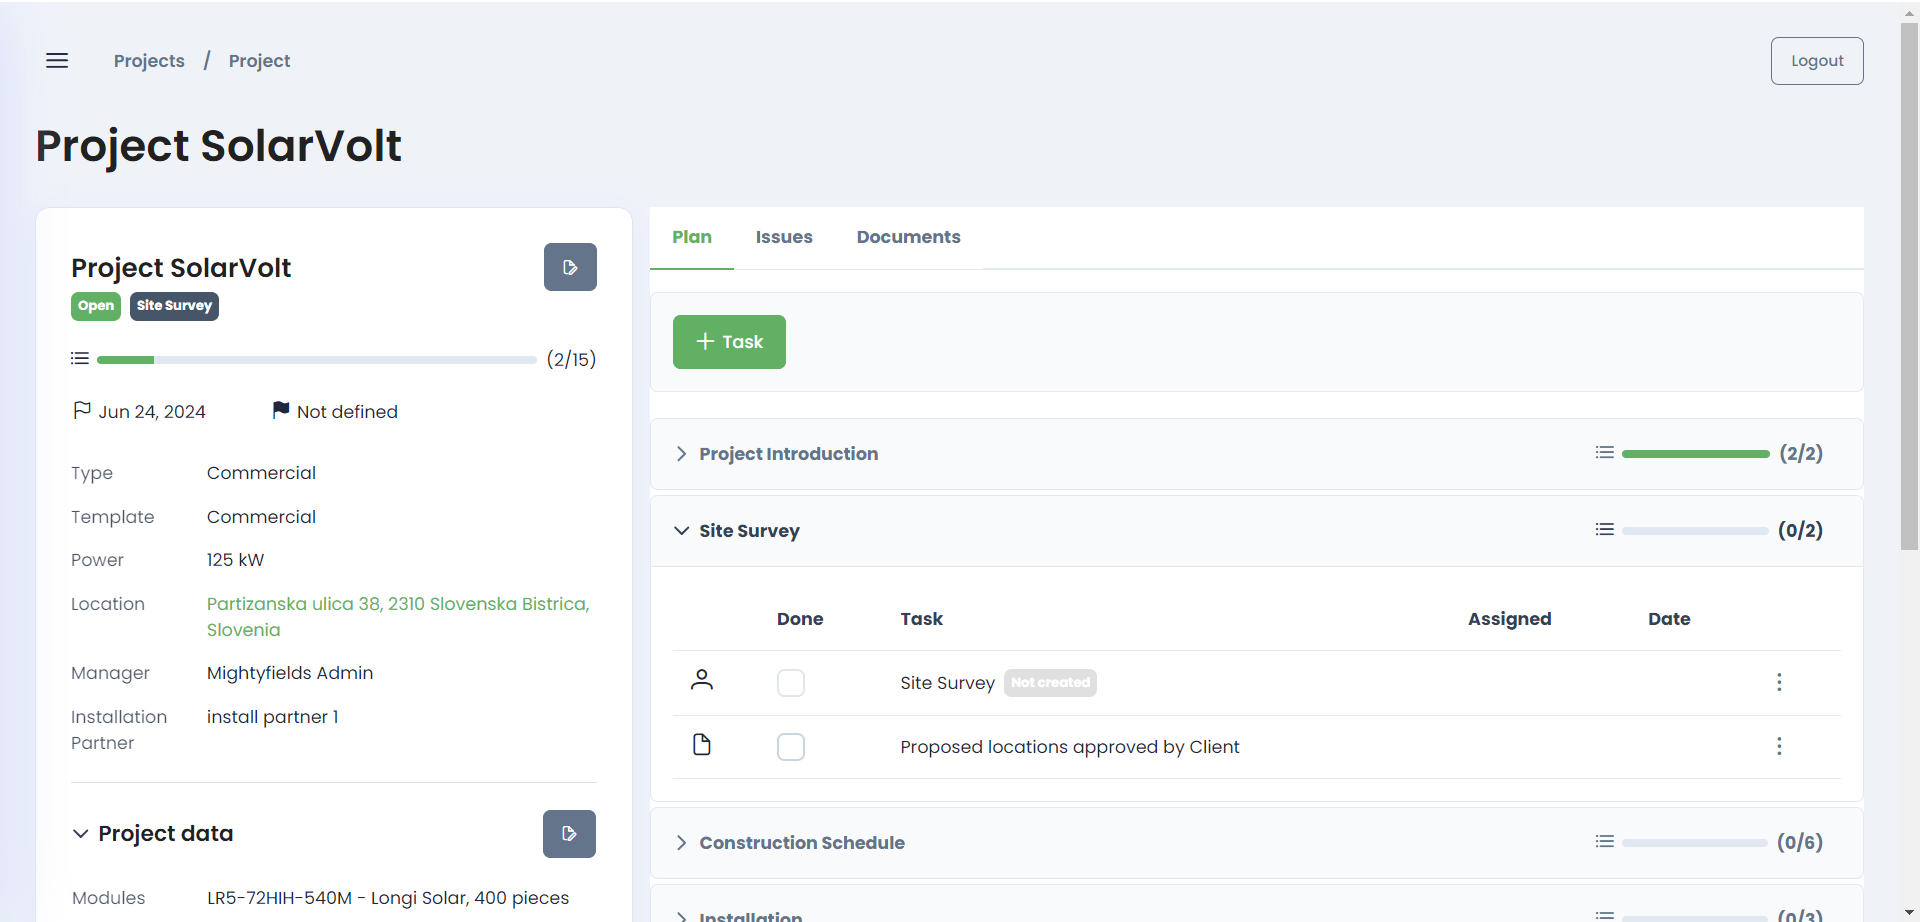
Once you create a new project or select an existing one, you will be redirected to your single project page.
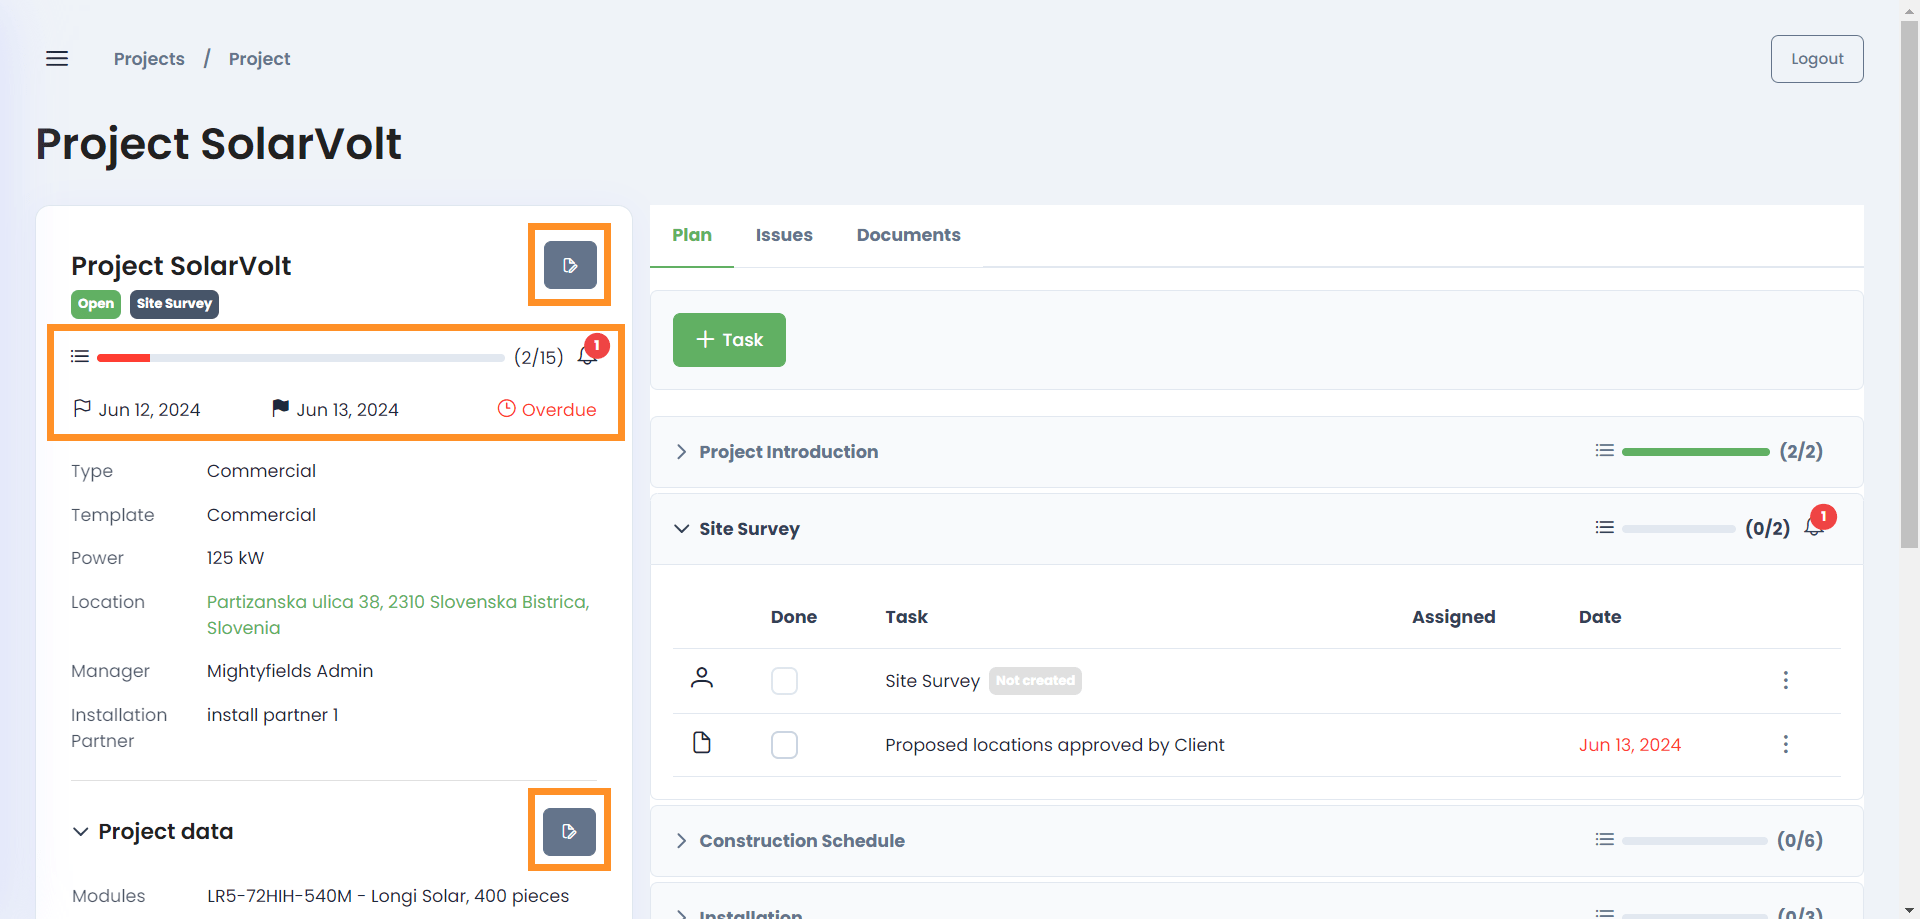
On the left-hand side, you will see more in-depth information about your project, its status, and customer data:
- You can edit all of this information by selecting the edit button.

- Progress bar – The colour of the progress bar on projects changes depending on whether a task is overdue. If none of the tasks are overdue, the bar is coloured green. However, if one or more tasks are overdue, the progress bar turns red, and you will also notice a bell icon indicating the number of overdue tasks.
- Project status – The status this project is currently in. The status is changed manually and can be either open, maintenance or closed.
 The white flag indicates the start date of this project.
 The black flag indicates the end date of this project.
On the right-hand side, you will see three tabs: Plan, Issues and Documents. We will now go through each of these tabs.
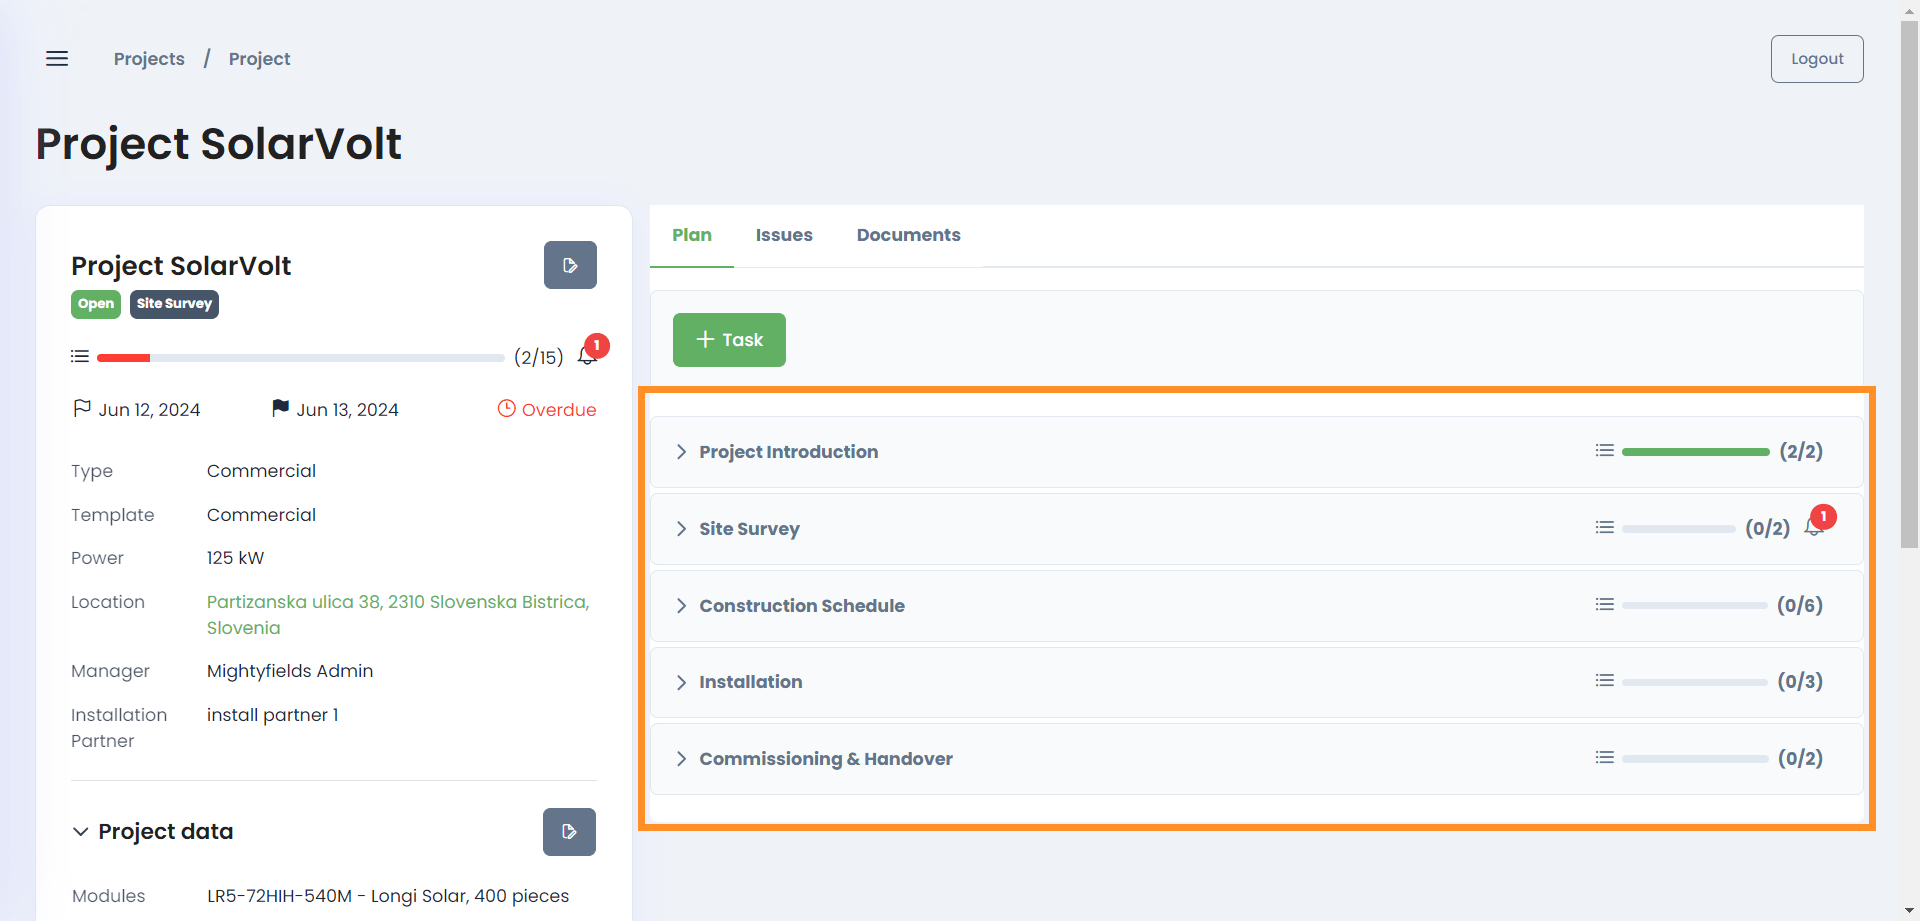
Plan
This tab allows you to view all of the stages of a project. These stages are created automatically and can be modified.
Each stage also includes a progress bar to better overview the project’s current stage and any overdue tasks. Similarly to the progress bar on the left-hand side, the colour of the progress bar in each stage changes depending on whether a task is overdue.
Each stage will already have office and field tasks available, based on our agreements.
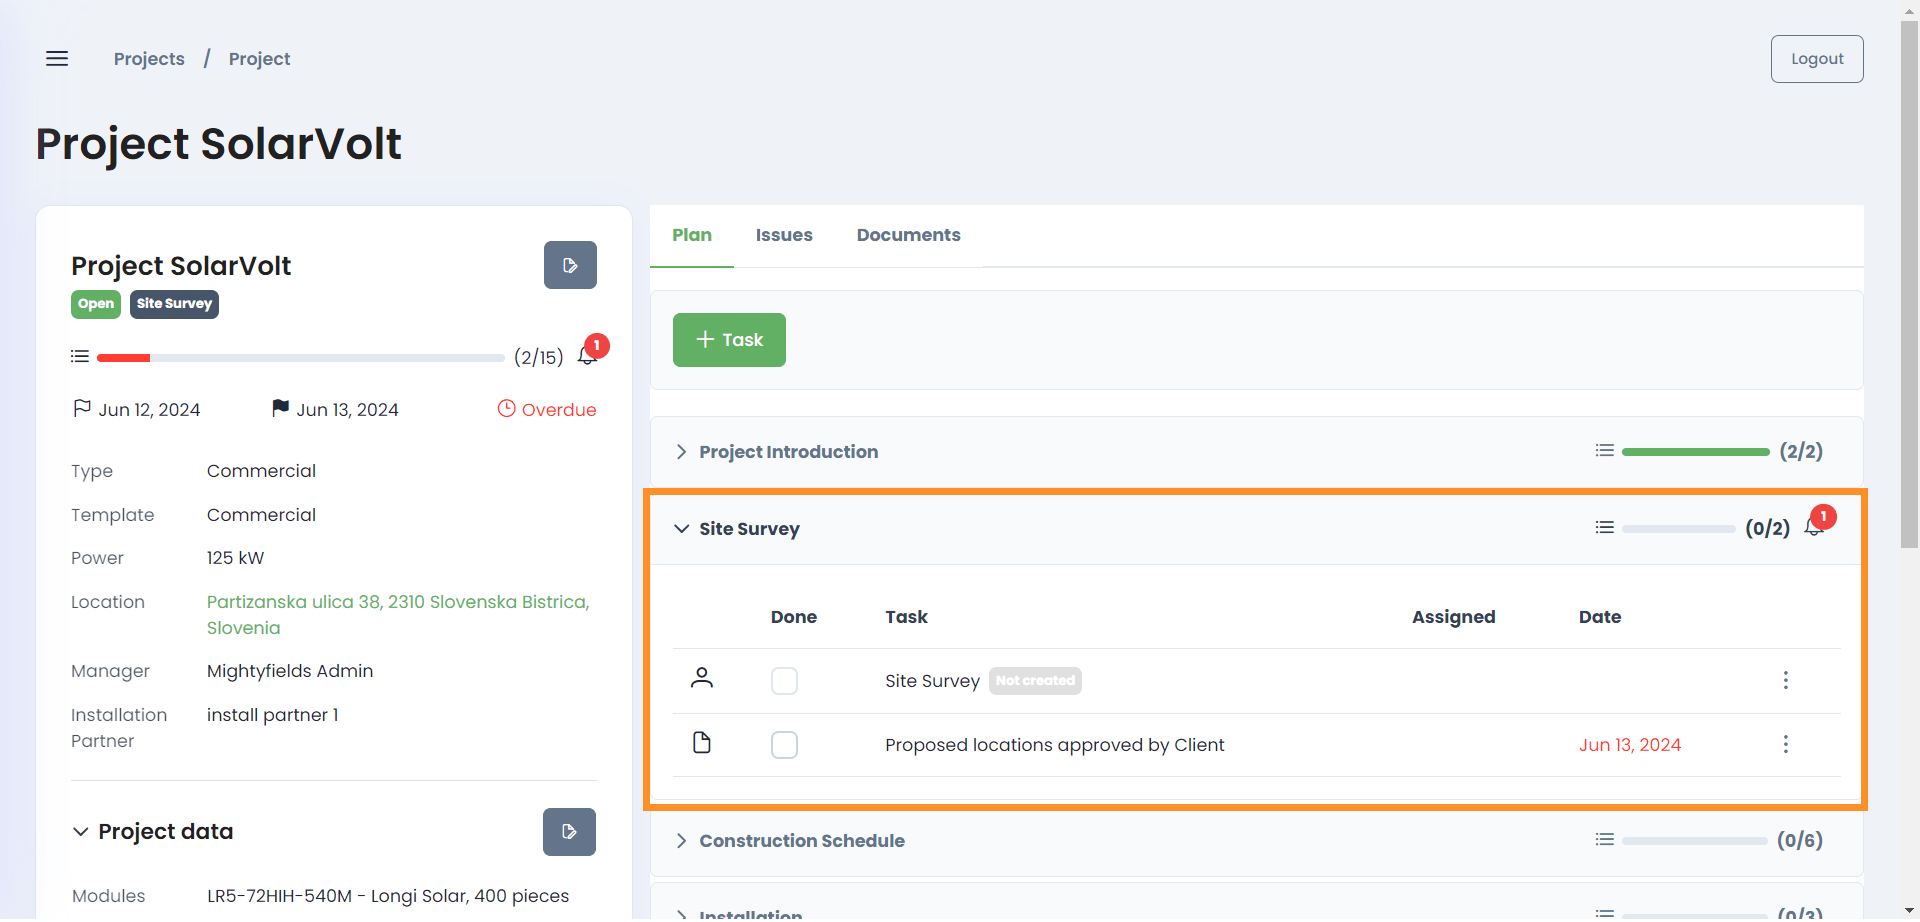
 – Office tasks are marked with this icon. Once you complete an office task simply click on the checkbox under Done. If you see the
  icon next to your office task, you will need to attach a document before you will be able to mark this office task as Done. To add a document, simply click on the icon and select the document you wish to upload.
 – Field tasks are marked with this icon. This will automatically be marked as Done, once the field task is completed on a mobile device.
If you wish to edit or delete any of the office or field tasks simply click on the ![]() icon on the right-hand side and select the appropriate icon.
icon on the right-hand side and select the appropriate icon.
For how to create a new field or office task, please see the Office and field tasks tab.
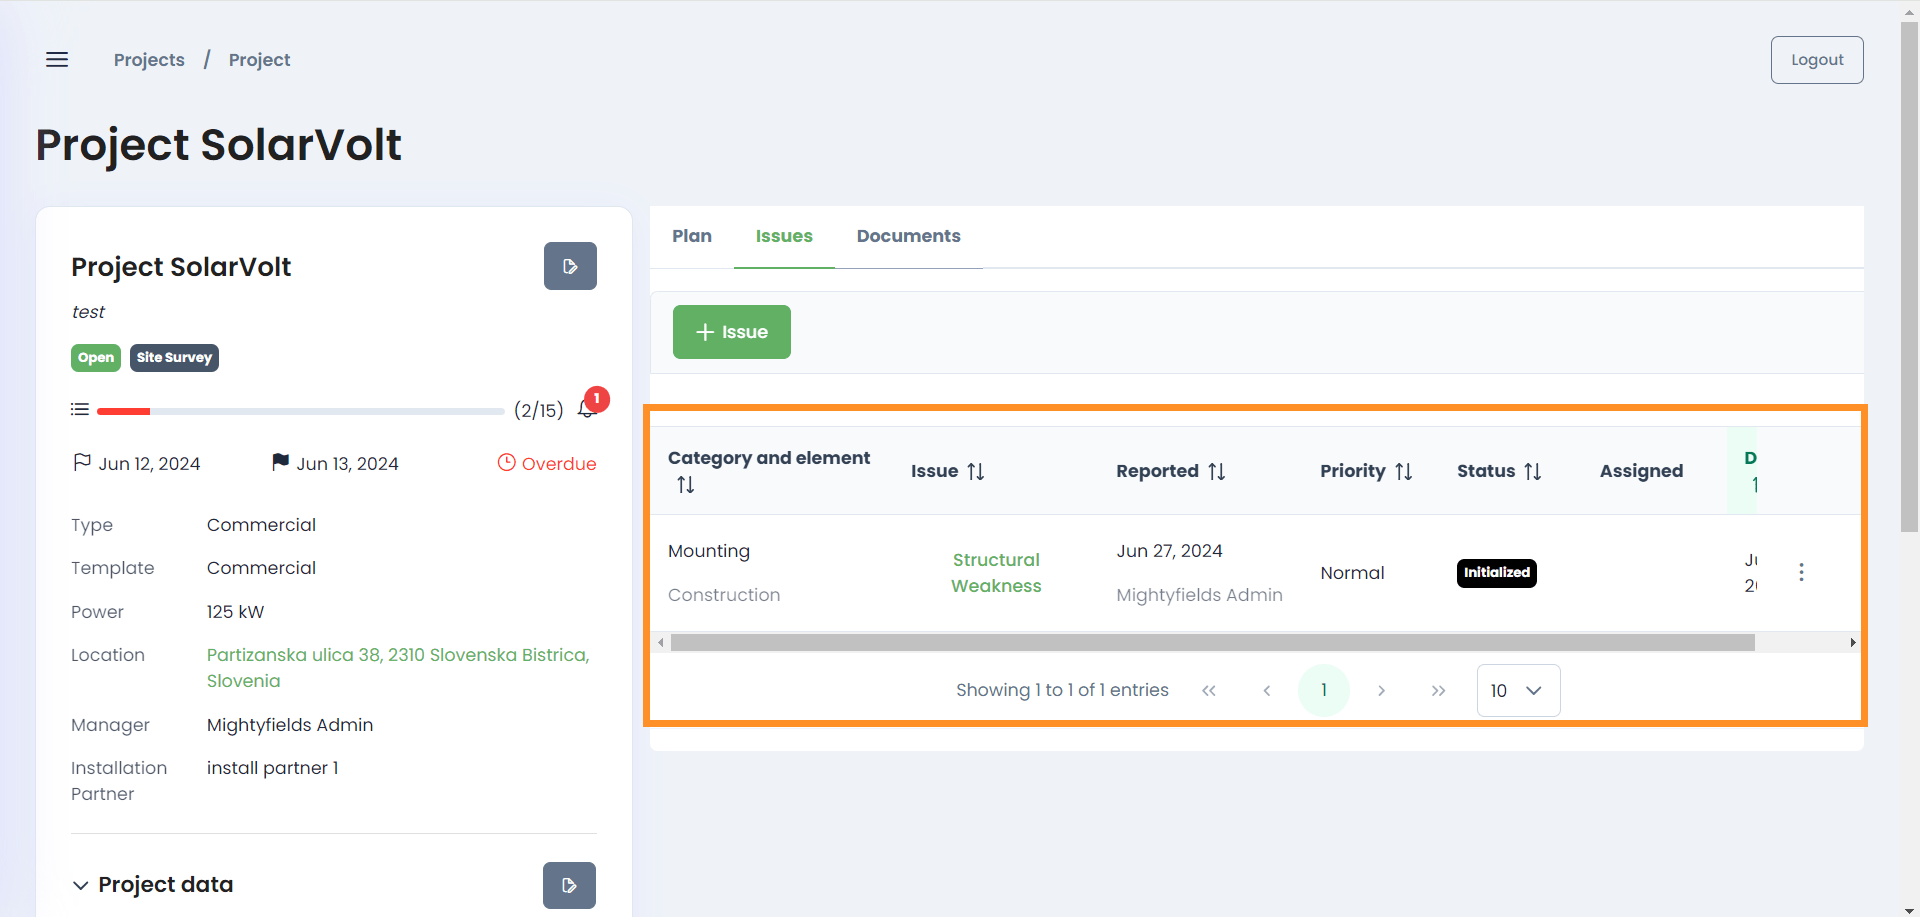
Issues
If your teams find any issues that need resolving, they can report them in the issues tab.
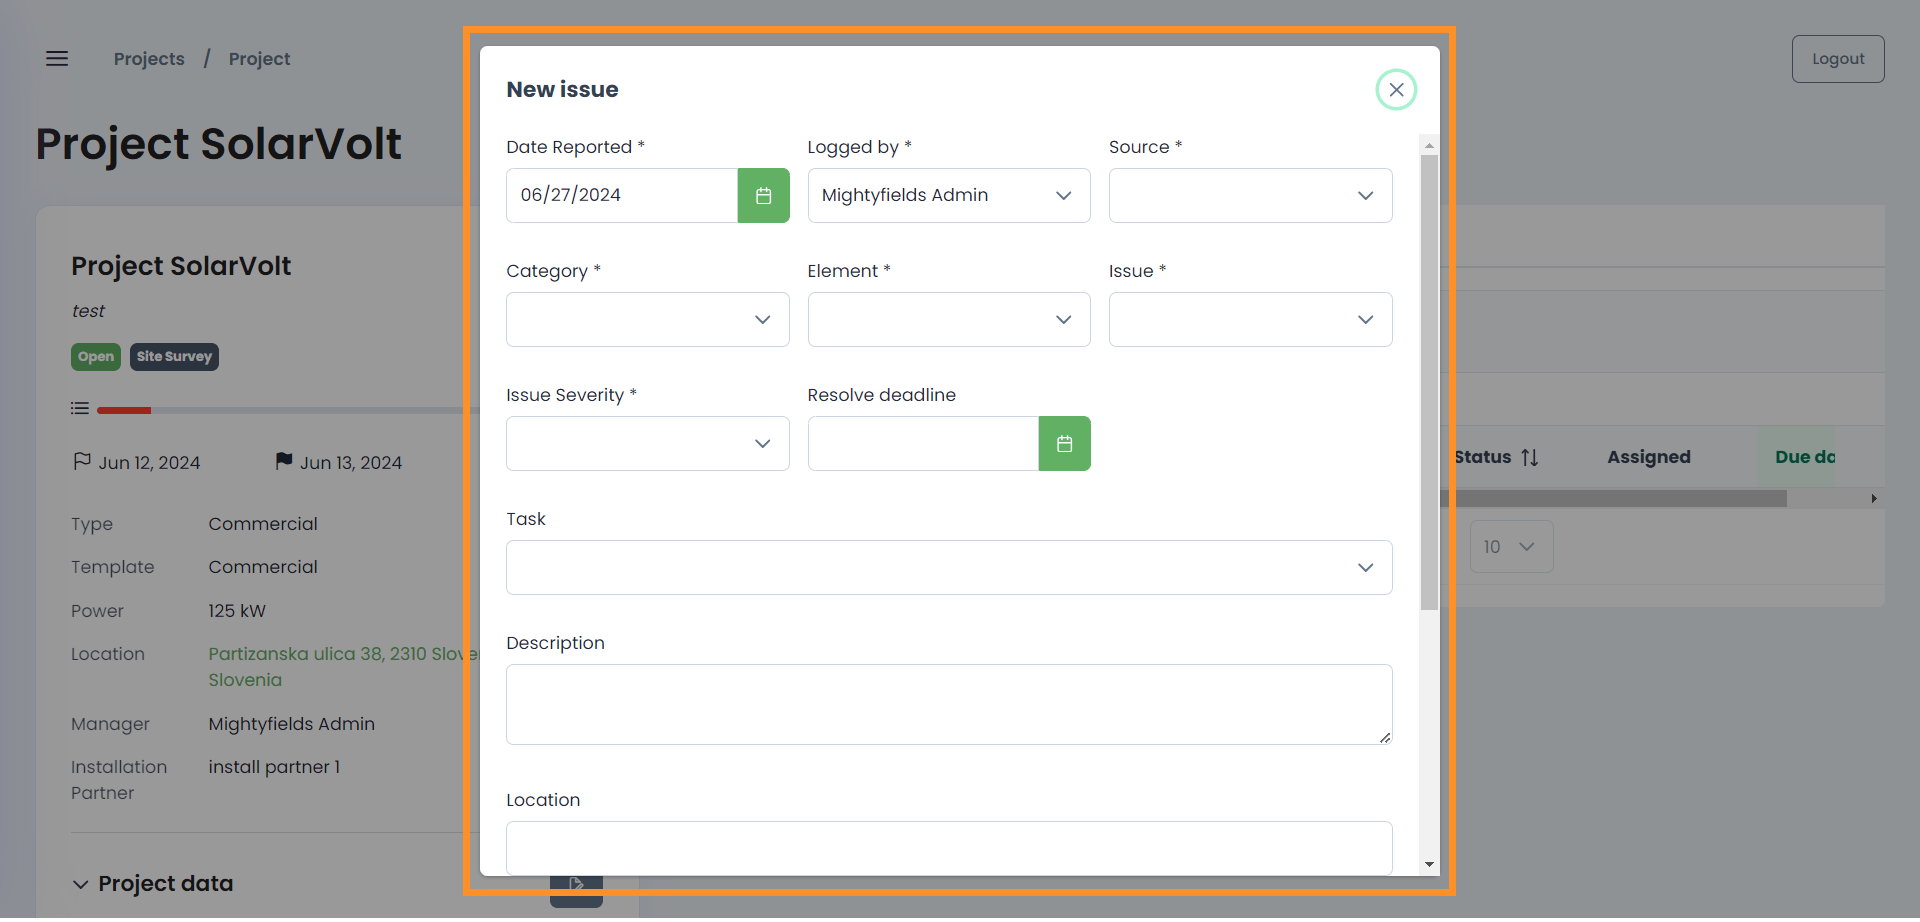
Steps to create, assign and resolve an issue:
#1 Create issue: To record a new issue, select the ![]() button . A pop-up window will appear where you will need to fill out the required information and select Save. A new issue log will be created, displaying all the basic information about the issue.
button . A pop-up window will appear where you will need to fill out the required information and select Save. A new issue log will be created, displaying all the basic information about the issue.
#2 Schedule field or office issue tasks: To schedule a task, select ![]() and
and ![]() . A a pop-up window will appear, allowing you assign either a field or office issue task. If the ”Site Visit Required” button is selected, the issue cannot be resolved from the office within MightyFields Solar and will need to be addressed by a field field worker. Only the person that the issue task is assigned to, can resolve the task.
. A a pop-up window will appear, allowing you assign either a field or office issue task. If the ”Site Visit Required” button is selected, the issue cannot be resolved from the office within MightyFields Solar and will need to be addressed by a field field worker. Only the person that the issue task is assigned to, can resolve the task.
#3 Resolve office issue: To resolve a scheduled office issue, select ![]() and
and ![]() . A pop-up window will appear where you can resolve the issue.
. A pop-up window will appear where you can resolve the issue.
#4 Close issue: To close the issue, select ![]() and
and ![]() .
.
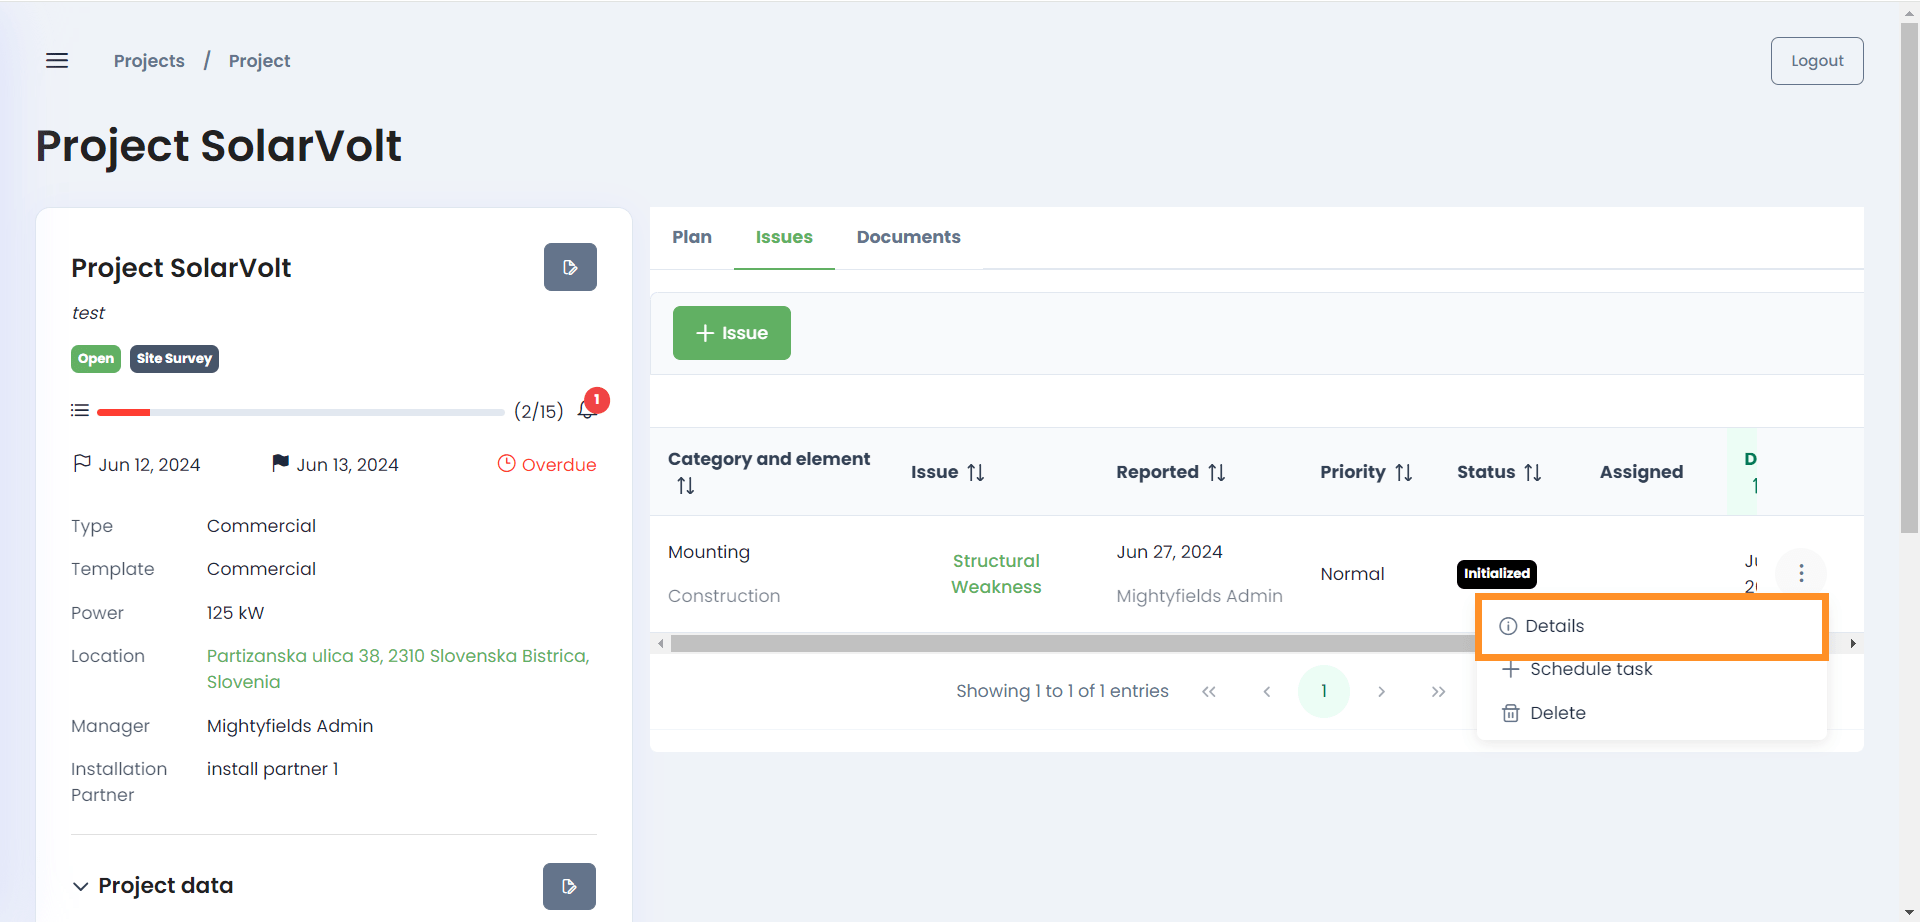
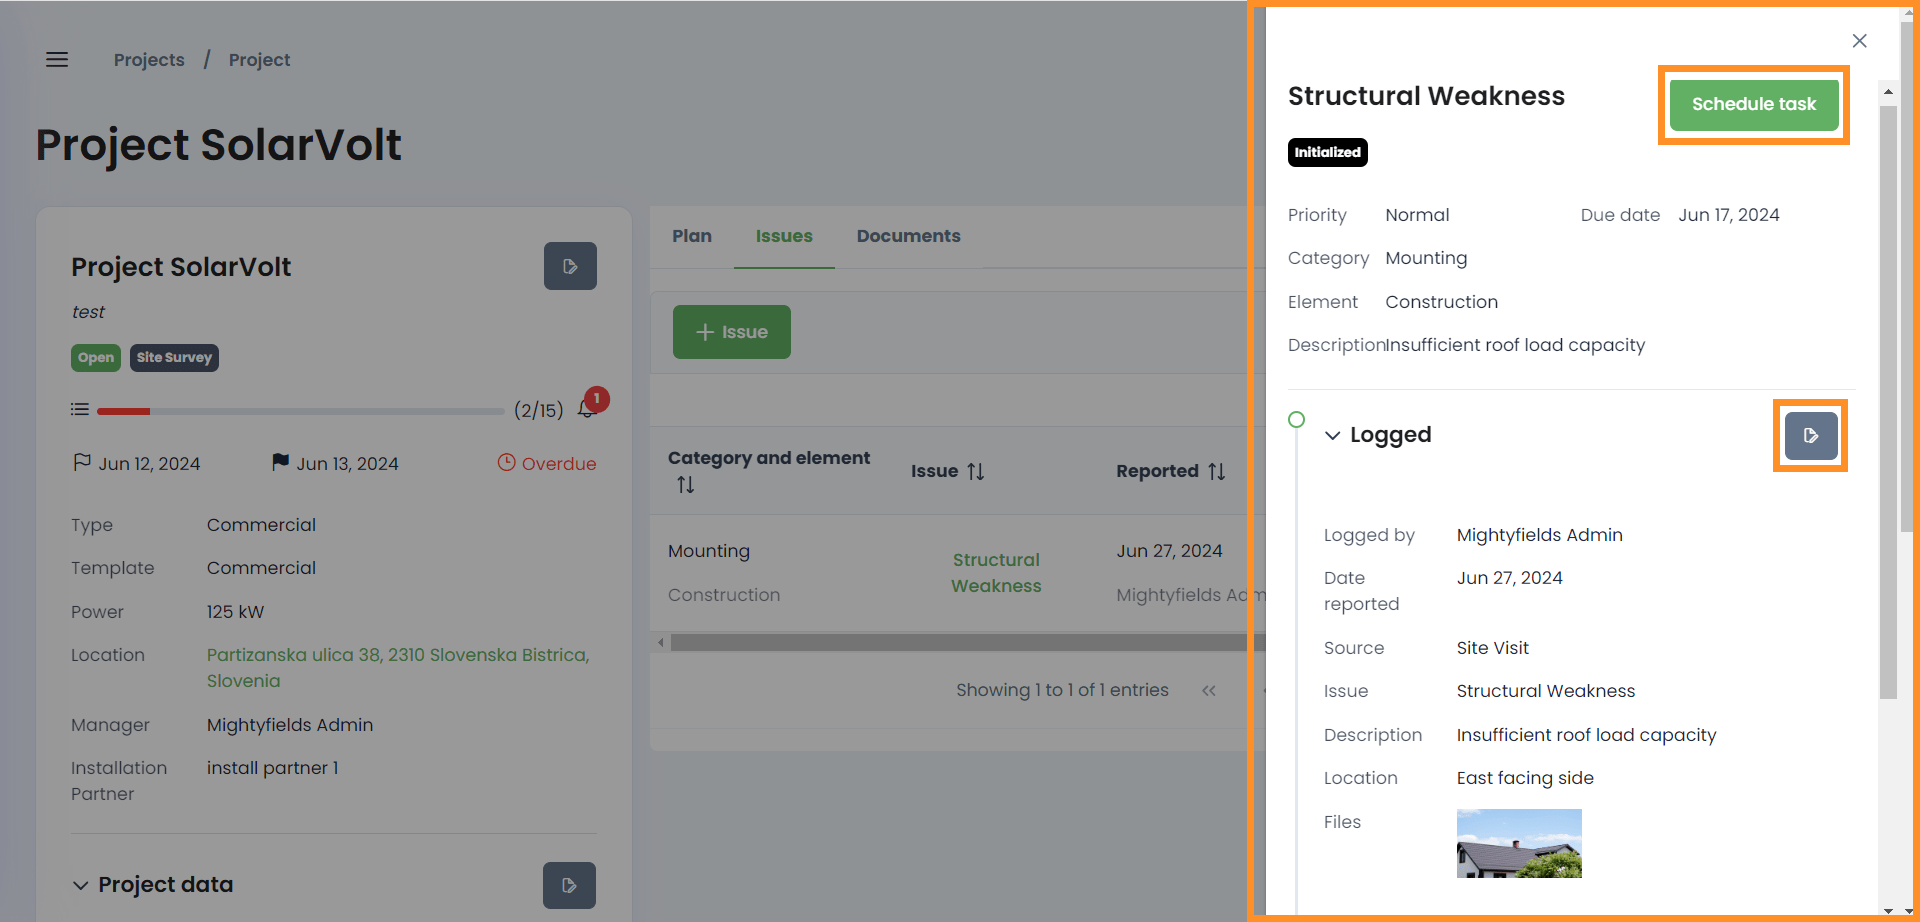
View more information about an issue by selecting ![]() and
and ![]() . A side window will appear where you can see all the information about an issue as well as all the stages. In this window you can also schedule, resolve, and close the issues. As long as the issue has not been closed, you can edit the issue by selecting in the
. A side window will appear where you can see all the information about an issue as well as all the stages. In this window you can also schedule, resolve, and close the issues. As long as the issue has not been closed, you can edit the issue by selecting in the ![]() button in the stage that you wish to edit.
button in the stage that you wish to edit.
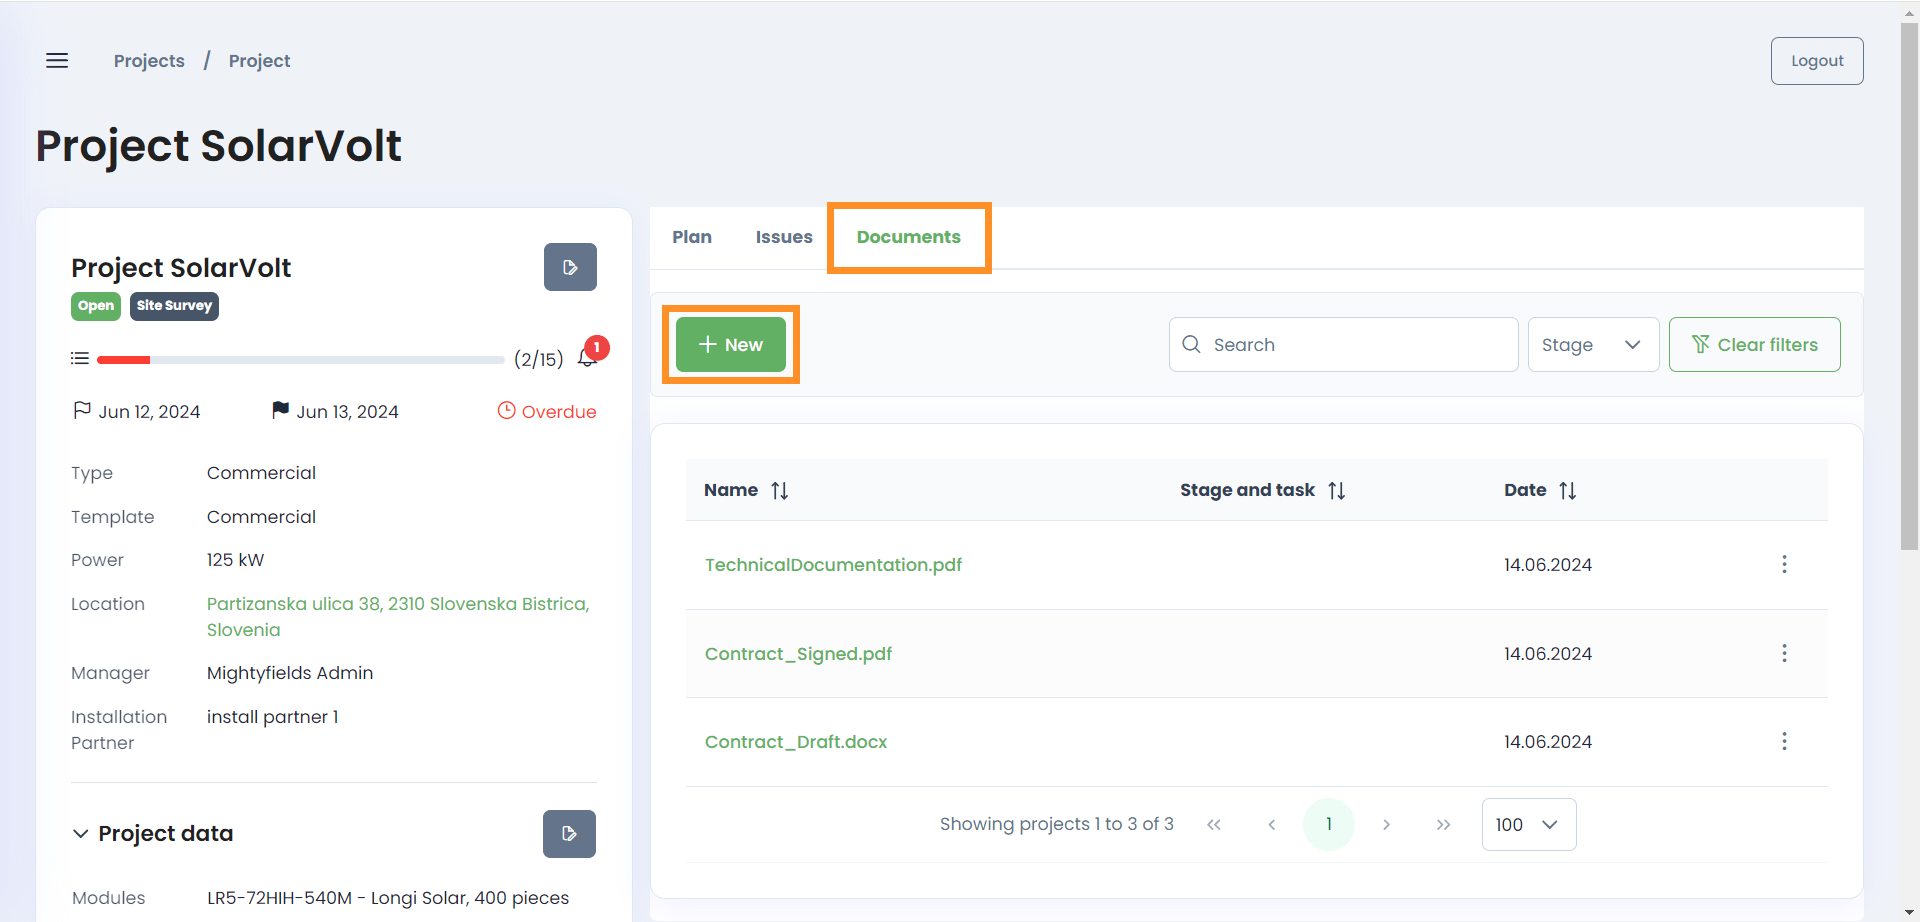
Documents
The documents tab allows easy access to all documents in this project. Here, you can view all documents added to this project or upload a new document.
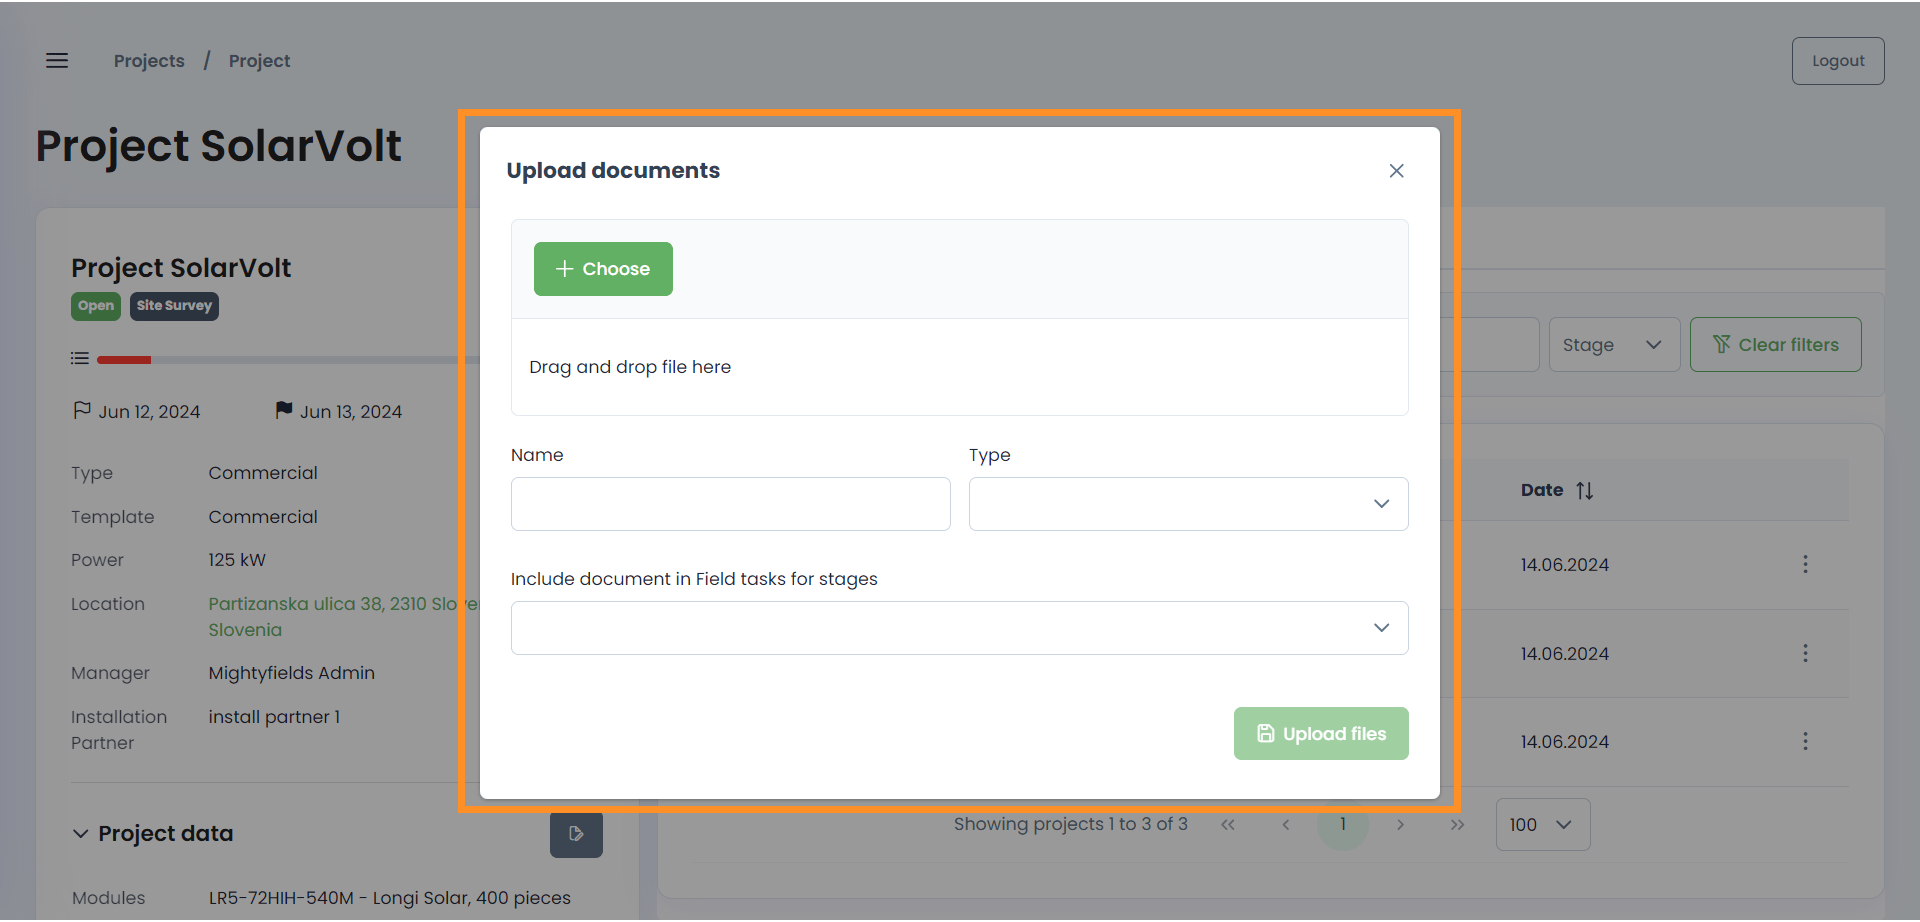
To upload a new document, select the ![]() button. Attach the document, give it a name, select the type of document you are uploading (technical document, contract, etc.), and, if necessary, select at which stage this document should be forwarded and visible to field workers.
button. Attach the document, give it a name, select the type of document you are uploading (technical document, contract, etc.), and, if necessary, select at which stage this document should be forwarded and visible to field workers.
Create office tasks
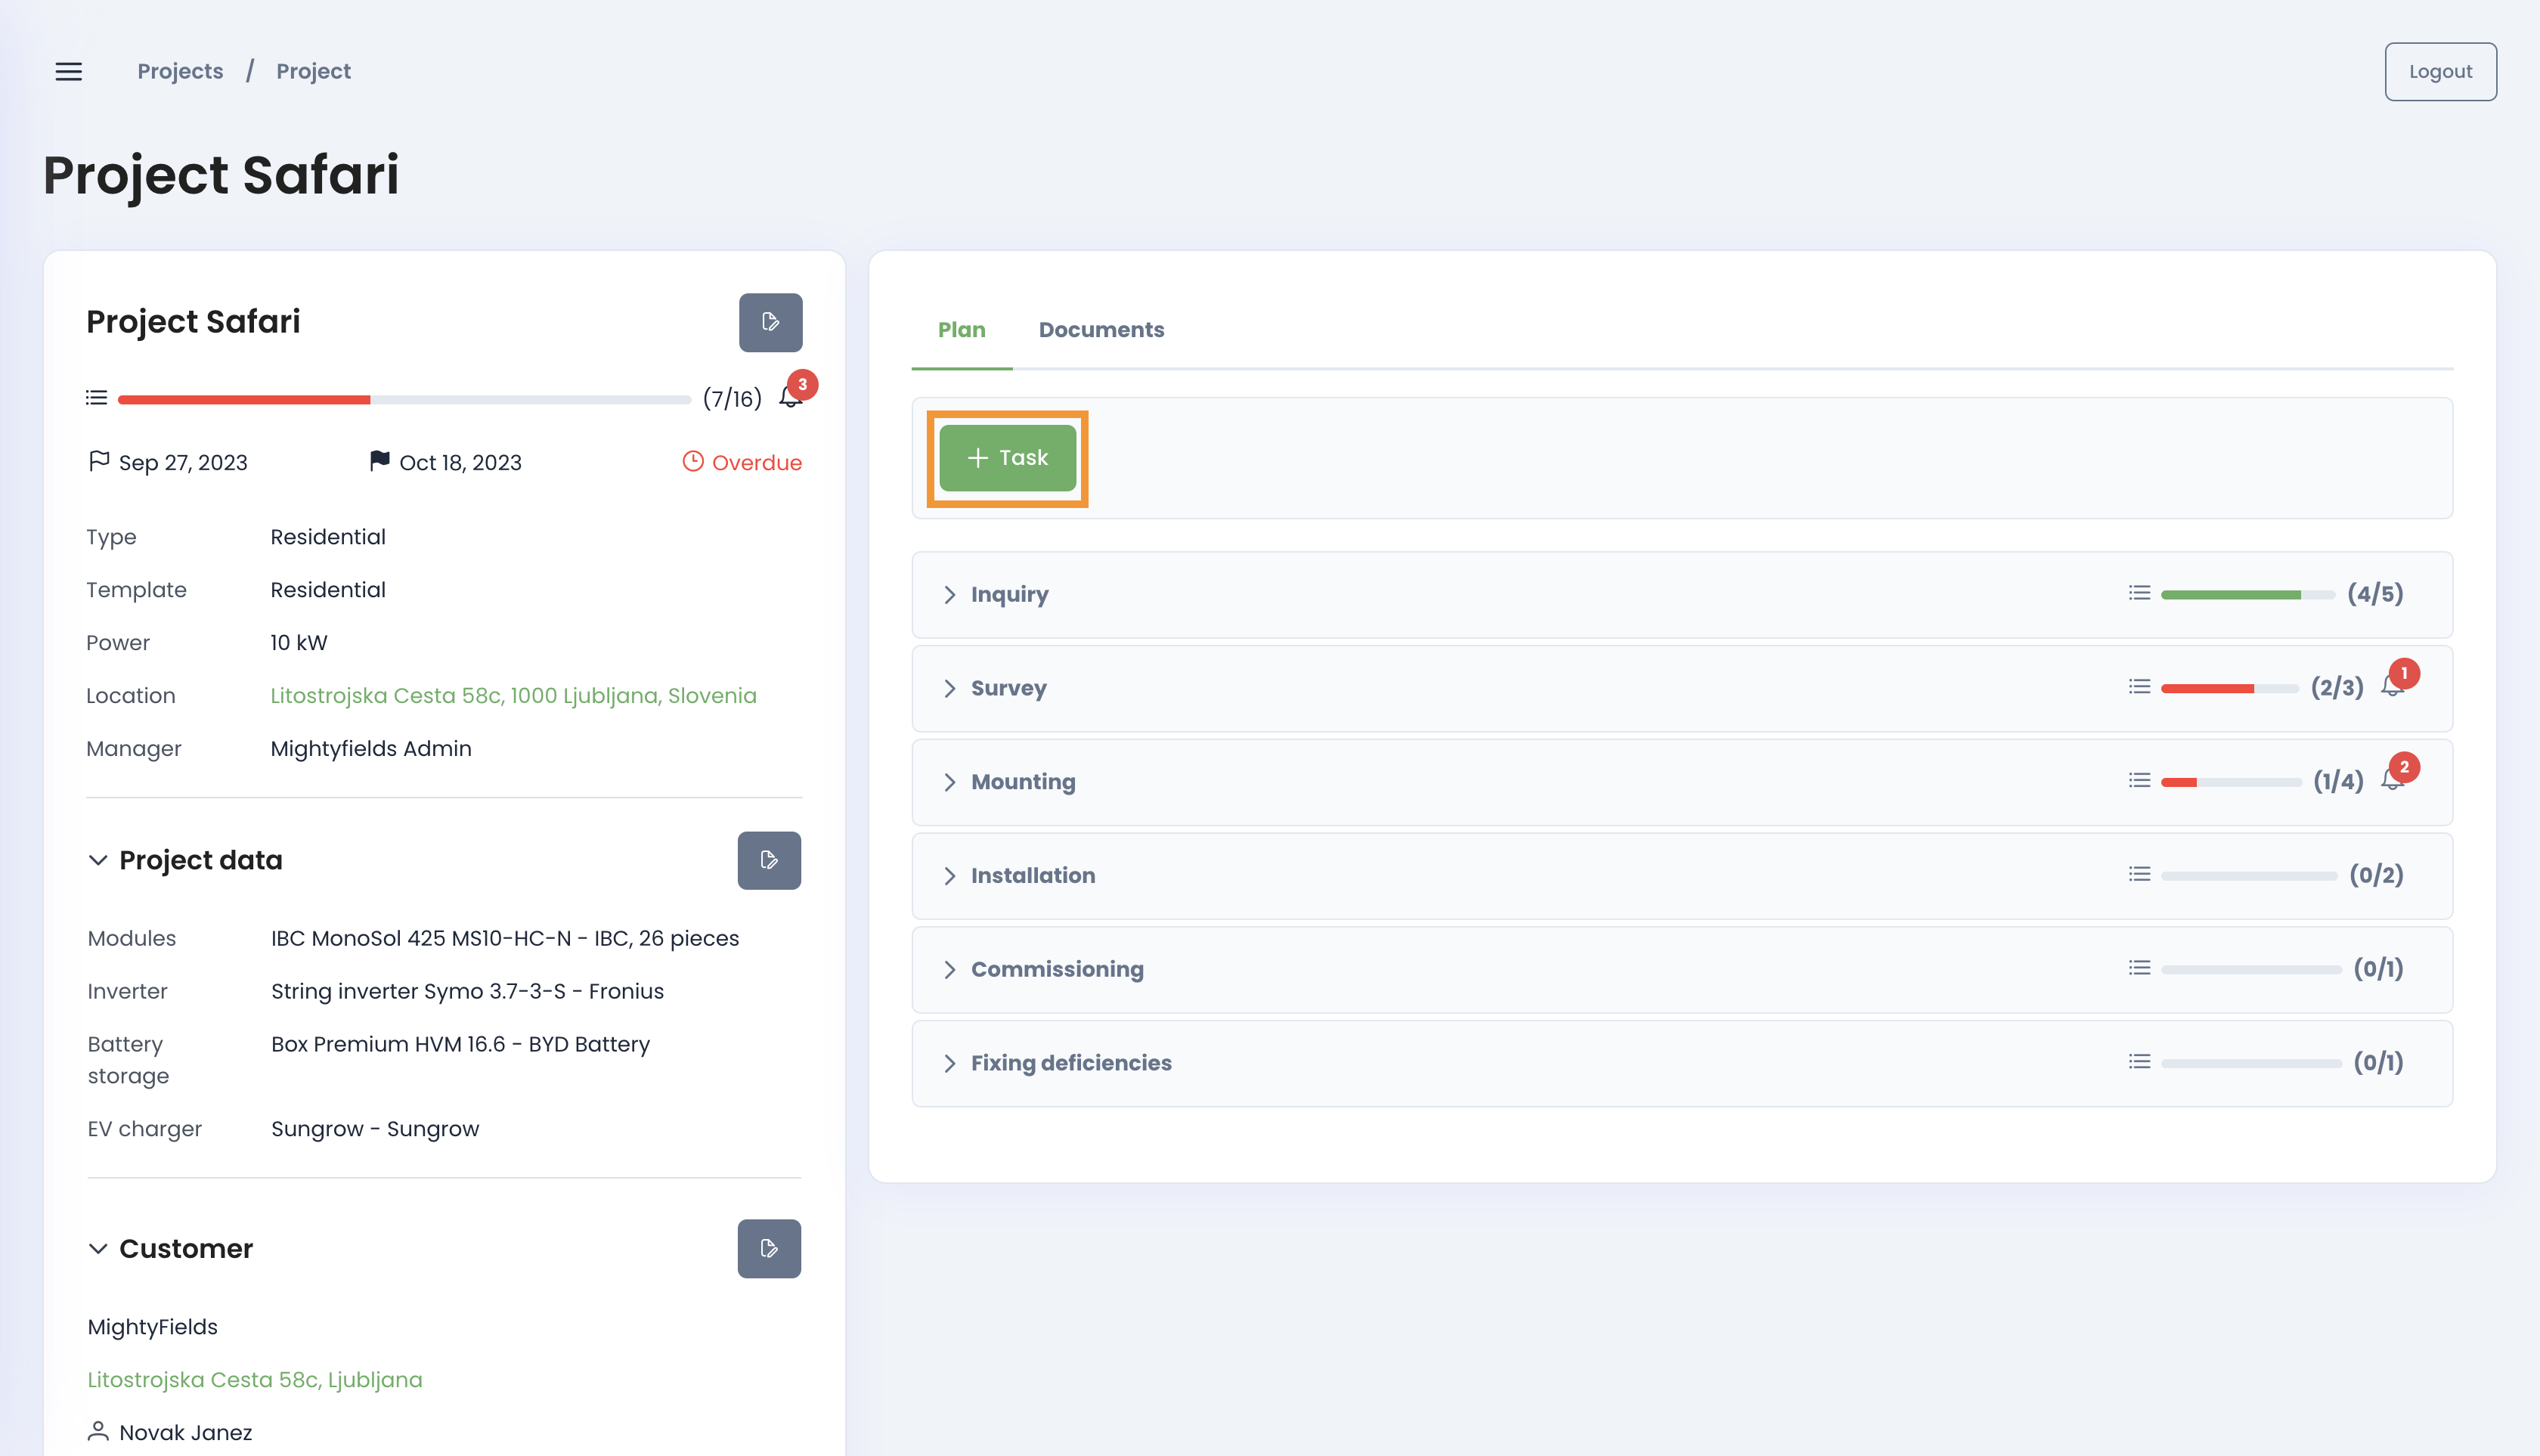
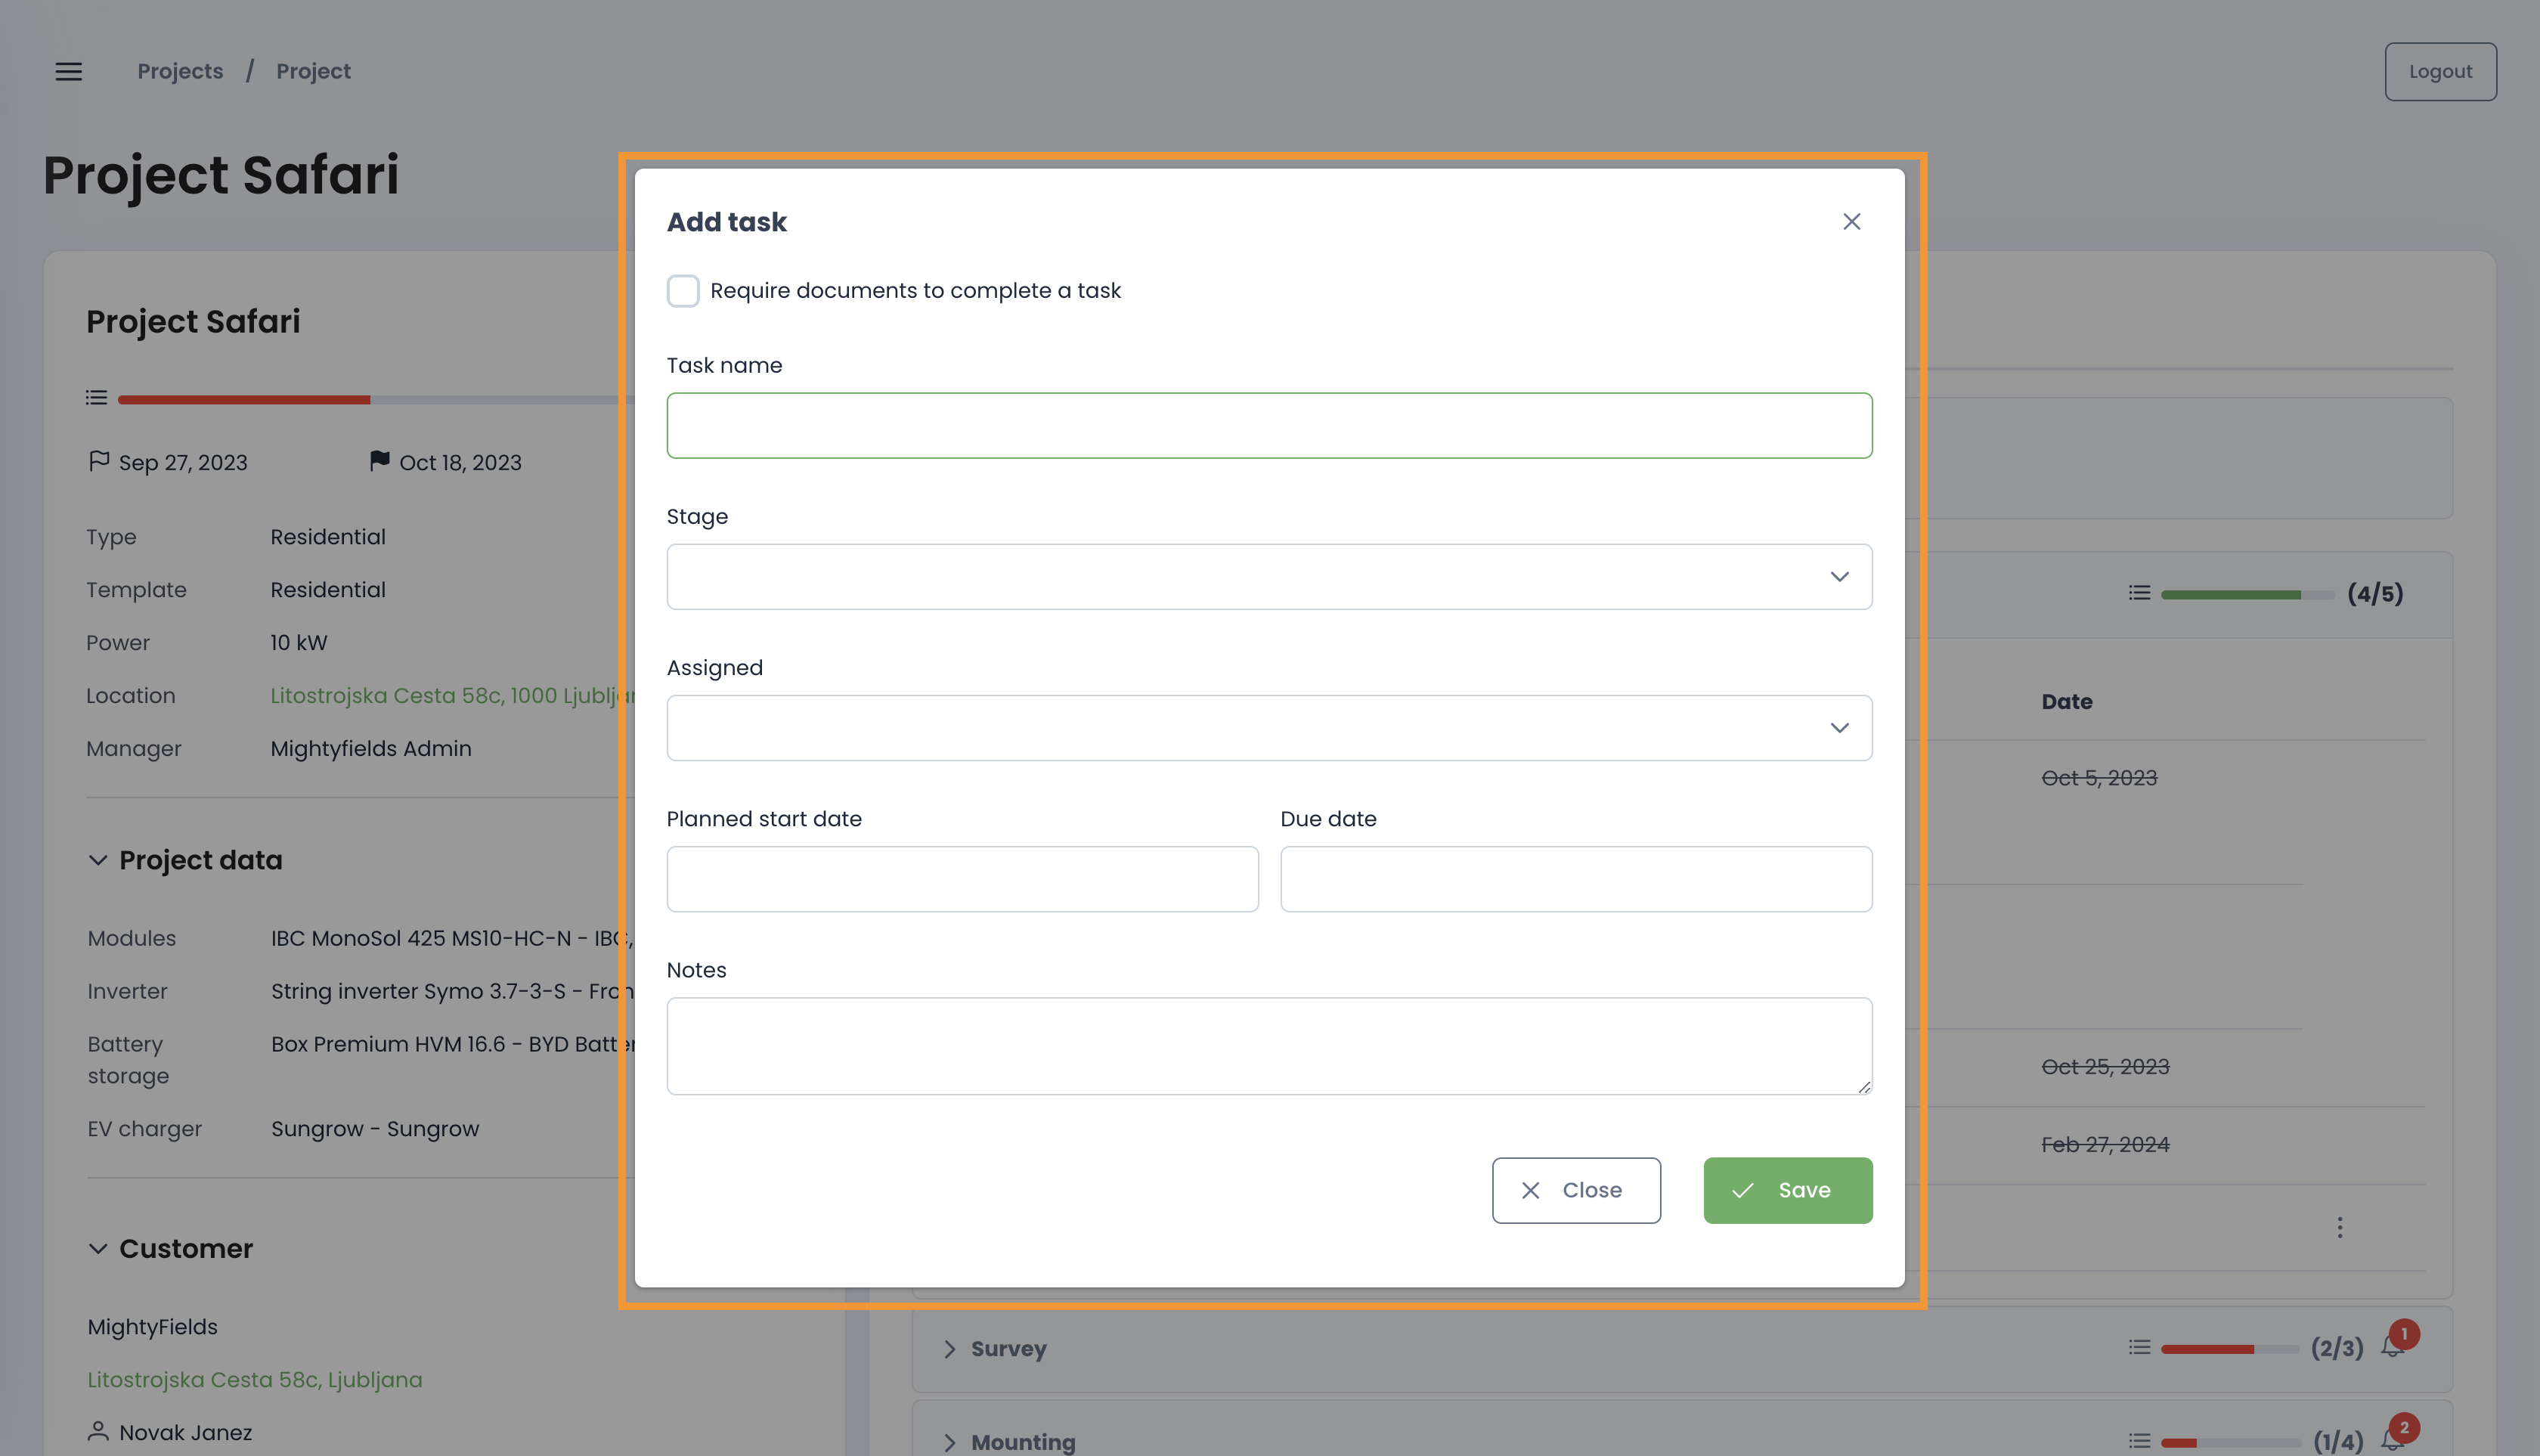
In each Project, you can create a new Task by clicking the ![]() button. A new tab window will appear where you can add new information about the task.
button. A new tab window will appear where you can add new information about the task.
Assign and schedule field tasks
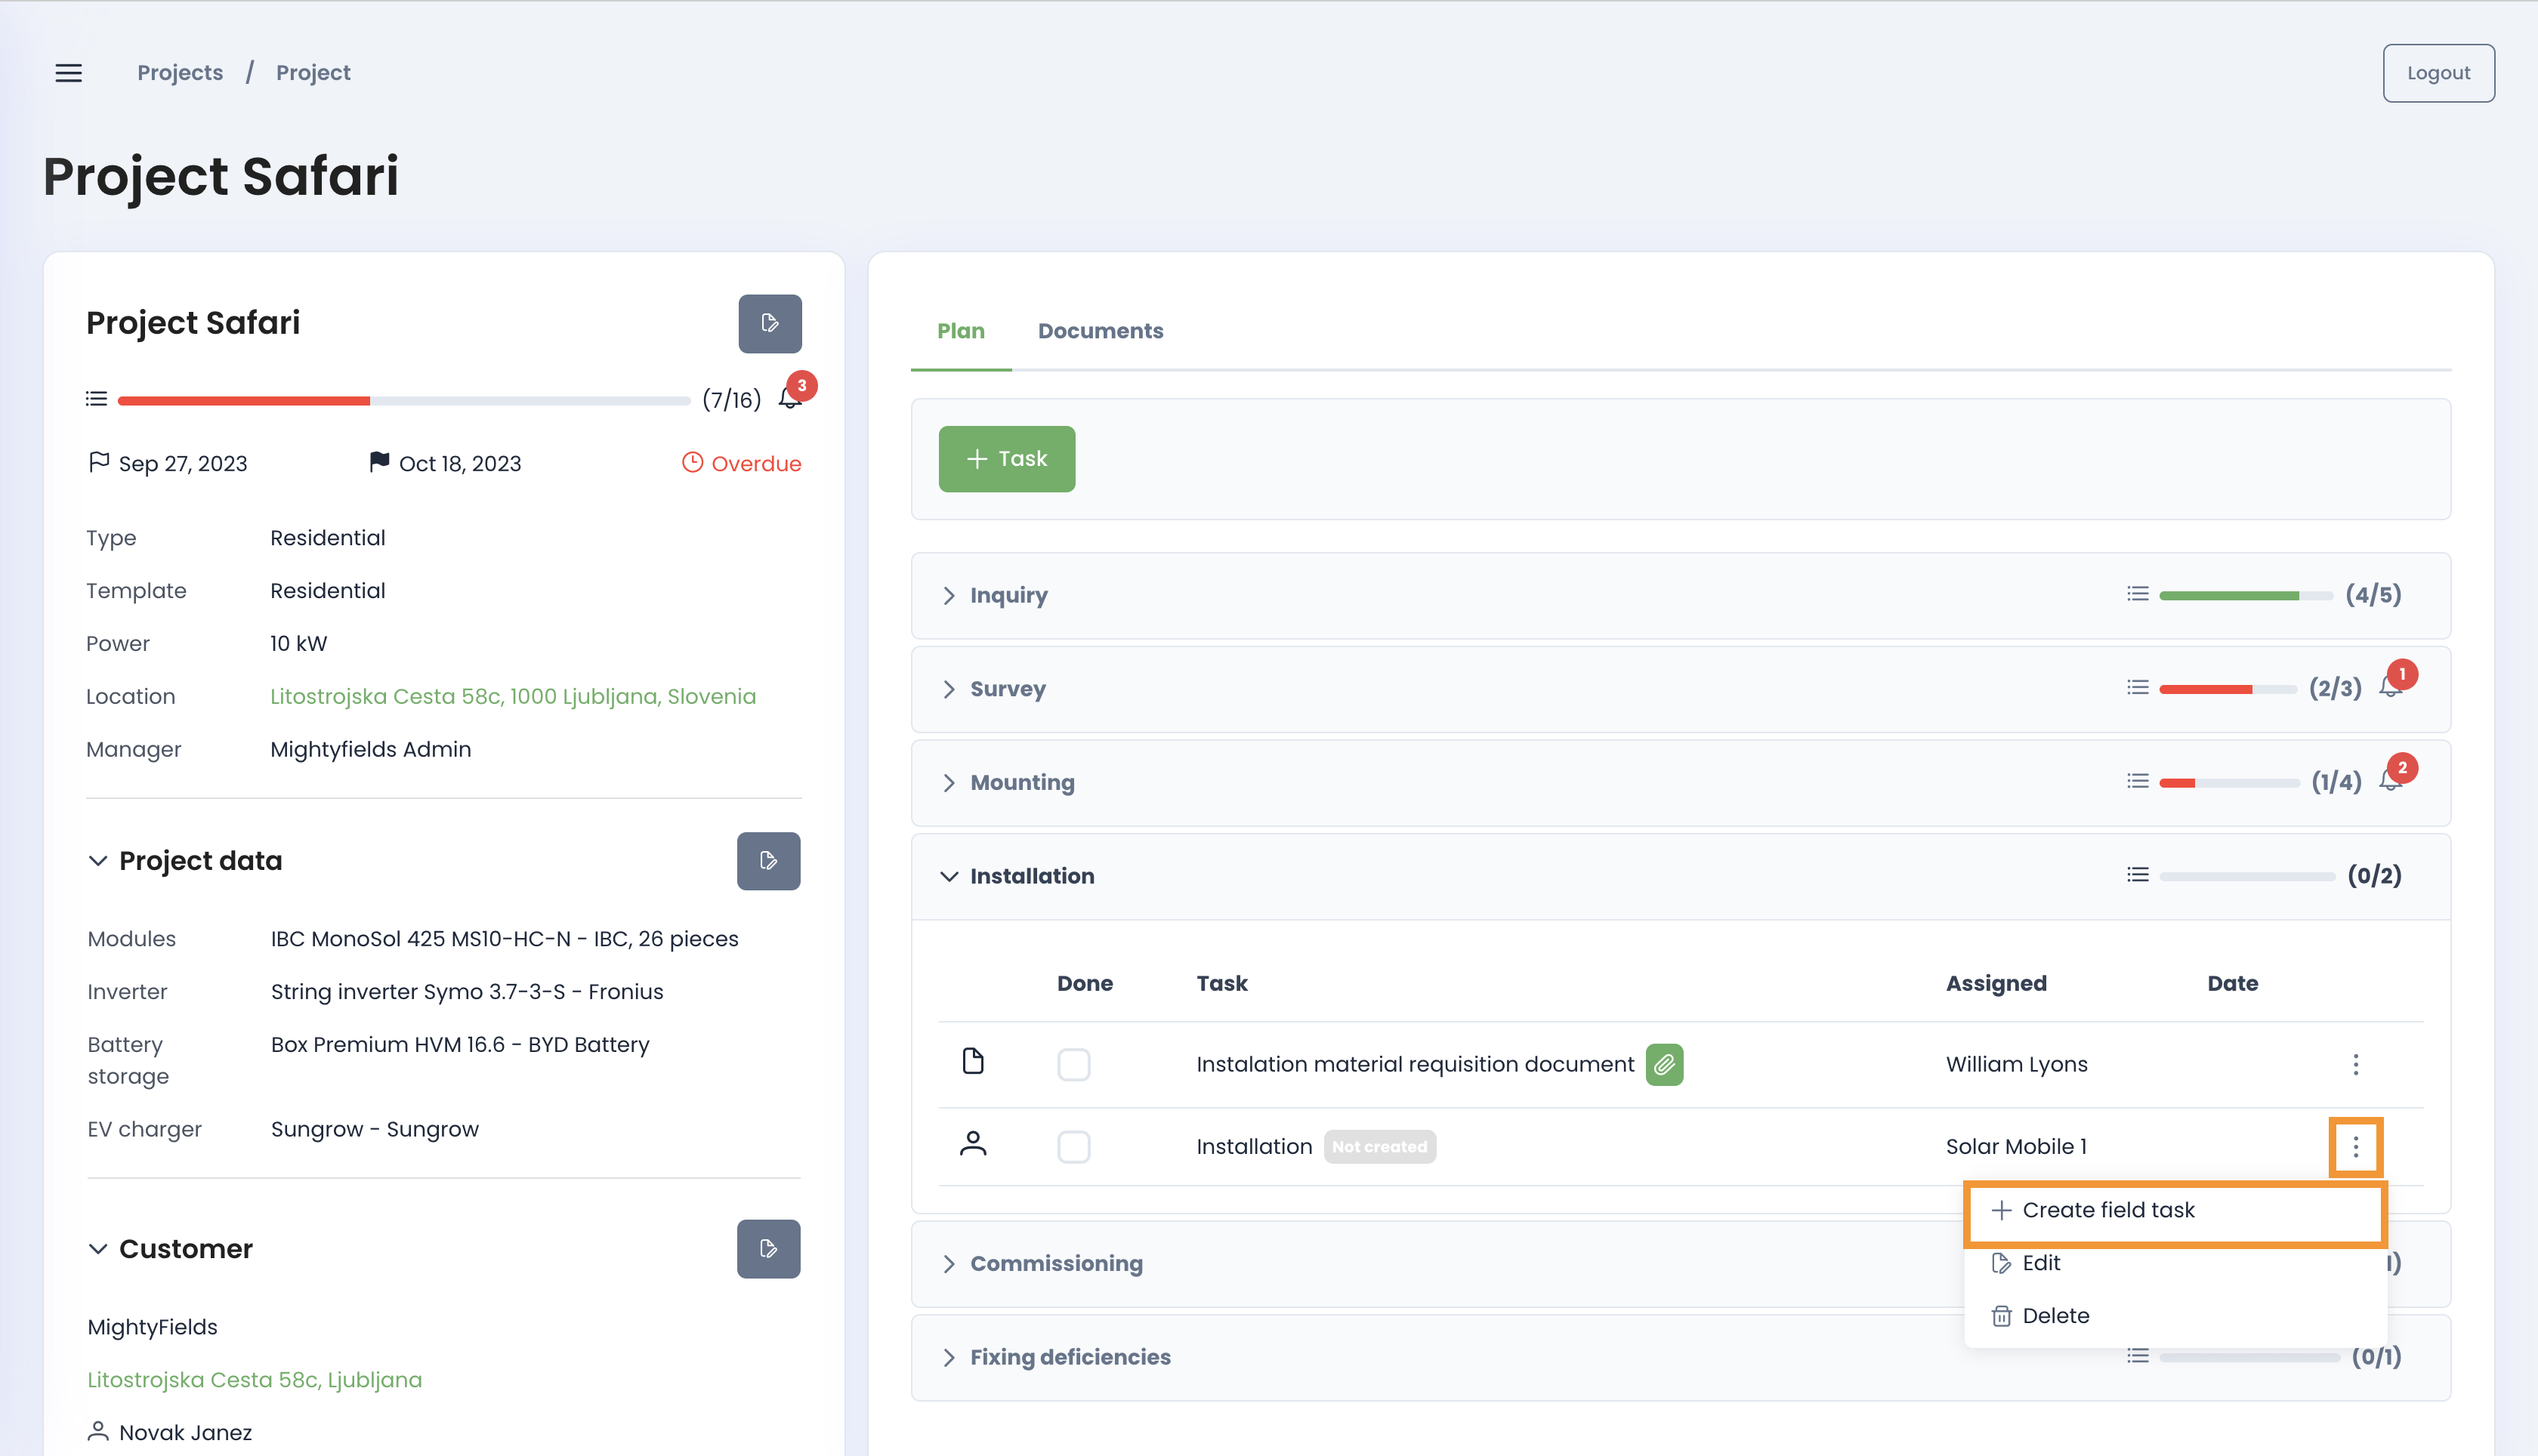
When you wish to assign a task to a field worker, open the stage in which you wish to assign a field task, select ![]() and click on
and click on ![]() . Keep in mind that you can only assign and schedule tasks to field workers, which are described with the
. Keep in mind that you can only assign and schedule tasks to field workers, which are described with the![]() icon.
icon.
The stage of the field task will change from “Not Created” to “Creating” . Now you can assign a field task to any field worker. You can do this by selecting ![]() and
and ![]() . When you click on the “Assign” button the MightyFields Scheduler will open.
. When you click on the “Assign” button the MightyFields Scheduler will open.
You may find all unscheduled tasks on the left-hand side. Schedule a task by simply drag-and-dropping a task to the right user in the calendar. When you are happy with your scheduling (you have chosen the proper technician and the time of execution), distribute the task to the field by clicking on ![]() . Doing this sends the task to the mobile device, and the technician receives the notification. The task will appear in their MightyFields mobile app.
. Doing this sends the task to the mobile device, and the technician receives the notification. The task will appear in their MightyFields mobile app.
Issues
If your teams find any issues that need resolving, they can report them in the issues tab.
Steps to create, assign and resolve an issue:
#1 Create issue: To record a new issue, select the ![]() button . A pop-up window will appear where you will need to fill out the required information and select Save. A new issue log will be created, displaying all the basic information about the issue.
button . A pop-up window will appear where you will need to fill out the required information and select Save. A new issue log will be created, displaying all the basic information about the issue.
#2 Schedule field or office issue tasks: To schedule a task, select ![]() and
and ![]() . A a pop-up window will appear, allowing you assign either a field or office issue task. If the ”Site Visit Required” button is selected, the issue cannot be resolved from the office within MightyFields Solar and will need to be addressed by a field field worker. Only the person that the issue task is assigned to, can resolve the task.
. A a pop-up window will appear, allowing you assign either a field or office issue task. If the ”Site Visit Required” button is selected, the issue cannot be resolved from the office within MightyFields Solar and will need to be addressed by a field field worker. Only the person that the issue task is assigned to, can resolve the task.
#3 Resolve office issue: To resolve a scheduled office issue, select ![]() and
and ![]() . A pop-up window will appear where you can resolve the issue.
. A pop-up window will appear where you can resolve the issue.
#4 Close issue: To close the issue, select ![]() and
and ![]() .
.
View more information about an issue by selecting ![]() and
and ![]() . A side window will appear where you can see all the information about an issue as well as all the stages. In this window you can also schedule, resolve, and close the issues. As long as the issue has not been closed, you can edit the issue by selecting in the
. A side window will appear where you can see all the information about an issue as well as all the stages. In this window you can also schedule, resolve, and close the issues. As long as the issue has not been closed, you can edit the issue by selecting in the ![]() button in the stage that you wish to edit.
button in the stage that you wish to edit.
Documents
The documents tab allows easy access to all documents in this project. Here, you can view all documents added to this project or upload a new document.
To upload a new document, select the ![]() button. Attach the document, give it a name, select the type of document you are uploading (technical document, contract, etc.), and, if necessary, select at which stage this document should be forwarded and visible to field workers.
button. Attach the document, give it a name, select the type of document you are uploading (technical document, contract, etc.), and, if necessary, select at which stage this document should be forwarded and visible to field workers.
MightyFields scheduler
To view the MightyFields Scheduler calendar, open the side menu and select Schedule ![]() A new window will open with the MightyFields scheduler, where you can view a calendar of all field tasks.
A new window will open with the MightyFields scheduler, where you can view a calendar of all field tasks.
On the left-hand side, you will see all unassigned tasks. The right-hand side represents your calendar and a list of all field technicians. To schedule a task, drag and drop the unassigned task to the right user in the calendar. When you are happy with your scheduling (you have chosen the proper technician and the time of execution), distribute the task to the field by selecting ![]() .
.
Colours in MightyFields scheduler:
![]() – The task is assigned to a field worker
– The task is assigned to a field worker
![]() – The task is distributed – task will be seen on the MightyFields mobile app
– The task is distributed – task will be seen on the MightyFields mobile app
![]() – The task is completed
– The task is completed
Once the task is distributed, the time, date, and person executing it cannot be changed. If you wish to change this information, the task needs to be undistributed. To undistribute a task, select the task you wish to modify in MightyFields Scheduler, click Actions, and select either Undistribute or Undistribute with notification. If you select the latter, the technician will receive a notification, notifying them that they no longer can see and edit the task.

Client communication
Let’s see how MightySolar will affect your communication with clients.
When using MightySolar, you will instantly access all the information from the field. You can either use this information in the reports to your clients or not.
The app is designed in a way that you can:
- define which information you would like to report to your clients from each particular stage;
- this information can be designed in a branded .pdf report – using visuals and stylistic constants of your brand;
- these reports can be sent to the clients afterwards by your office staff and/or by the system right after the work in the field has been accomplished;
- the email in which your client will receive the report will also be branded – using visuals and stylistic constants of your brand and sent from your company’s email address.
You might also want to hear this
#1 Details about client reporting and communication will be defined during the Mighty Process Hack we will perform before the onboarding. Note that the system is adaptable to your needs.
#2 All client reports will instantly be available for your office team within each project stage. See Project & stages overview.

Mighty Mobile
Your field technicians, field agents, installers … perform their job seamlessly when they:
- execute all the tasks with a high degree of quality and professionalism;
- communicate with your internal team (support office team) promptly, openly, professionally; and
- communicate with your client in a way that supports the preferred feel of your brand.
With MightySolar, you can affect all of the above to a certain level. Let’s see how.
About & how to access
MightySolar Mobile is a mobile app to support field technicians in their job execution and communication. With MightySolar Mobile, the field technicians access all the relevant information for their work and capture the data about the executed work.
You can access MightySolar Mobile after downloading the app from:
- AppStore
- GooglePlay
Every user receives their username and access to the password setup page in their inbox from our mighty support team. In case you would forget the password, please follow the link Forgot password below the login area.
View tasks & pre-visit activities
When a task is sent to a field technician, they will receive a mobile notification about the date and time of the scheduled visit to the client.
Opening the mobile app, on the first screen, the technicians will find a set of tasks delegated to them. They can see the tasks in date/time or location order, each valid for its specifics.
Swiping the task to the side, the technician can easily access the following shortcuts:
- a telephone icon to phone the client and inform them about their visit; and
- a navigation icon to let their preferred navigation app navigate them to the installation site.
Get prepared for the visit
Clicking on one of the tasks, the technician can access all the documentation they need to prepare for the visit.
They will access the following:
- basic installation data – basic information about the project, assets used, assets needed to bring etc.,
- data from previous stages – the executed work during the previous visits to this site,
- all other documents you might find helpful for the installer – e.g. solar plant design documentation, specific instructions for new team members, specific instruction from assets manufacturers, on-face photo of the building entry etc.
Capture the data & close
The data capture must be as simple and smooth as possible for the field technician. That is why the mobile capture is designed in a way that:
- The technician can only see the fields that they need to fill in depending on the data they have captured by then;
- When it is possible, they do not explain and type the data to the device (they instead take a photo, edit it or choose a relevant answer from the list of possibilities);
- Almost any kind of data capture is possible, but most appreciated by the users are photo capture/editing, bar code scanning (also with BT readers when needed), signature capture, table editing etc.
The task can be closed once all the obligatory fields have been filled in. Multiple visits to the installation sites often occur not for execution but primarily for poor data capture at the site. This feature assures you to manage your team’s efficiency and the quality of client communication.
On- and offline data capture
Once the task is on their mobile device, the technicians can use the app with or without an internet connection. All the data will also be saved to the mobile device while offline, and the data transfer to the MightySolar Office will happen once the internet connection is established.

If this is your first time using MightySolar?
Consider using it in all the roles:
- as an office staff (managing the project, assuring the quality of field installations and client communication);
- as a field technician (relying on the mobile app as support to the work that needs to be done in the field and capturing information about the work done); and
- as a client (having a clear overview of services they are paying for and documents they sign on the way to installing their own power plant).
This is possible when you:
- Start a new project for which you are the client – your name, surname, address, phone number and email address… is the client’s data; and
- Schedule tasks to yourself as if you were a field technician – your name will appear among the users in the scheduler. Don’t worry; follow the flow presented above.
This way, you will be able to test the whole flow, including the following:
- How the client receives automated email and PDF reports after the visit, and
- how the field technician can call the client from the field or be guided to the location from the app.
IF YOU ARE UNSURE OF WHAT TO CLICK ON
Note that all “Action buttons” are mighty green and probably the right ones for your following action.